Are you looking for a good Midjourney tutorial?
Unfortunately, most of the Midjourney tutorials out there only serve up superficial information on how to use it.
More in-depth instructions and explanations on how to use the various different commands are relatively uncommon, even though that’s exactly what people are looking for.
In this Midjourney tutorial, we’ll not only walk you through your initial steps of learning how to use Midjourney but also provide pathways into deep dives on other sub-topics.
Let’s dive right in.
Table of Contents Show

Like this content? Then share it!
The Only Midjourney Tutorial You’ll Ever Need
www.tokenizedhq.com
Here’s the answer. Great article by @ChrisHeidorn right here: https://tokenizedhq.com/midjourney-tutorial/
Getting Started With This Midjourney Tutorial
Before we go into detail on the various different areas that we can cover for additional learning, let’s focus on the absolute basics first.
If you already have access to Midjourney and have a decent understanding of how it works, then you can skip this entire section and jump straight to our Deep Dives to expand your skills in very specific areas.
However, if you don’t even have access yet, then stick around and we’ll have you up and running in no time.
Setting Up a Discord Account

Something that many new users who look for a Midjourney tutorial are initially confused by is the fact that Midjourney currently doesn’t have a regular web app.
Or even though it does, it’s not used to create images.
Midjourney’s AI currently exists in the form of a Discord bot that sits inside a Discord server.
And in order to interact with it, you must have a Discord account.
If you’re not familiar with Discord, it’s essentially a social messaging platform that supports text, audio, and video.
It’s a lot like Slack but feels more like a pimped-up version of IRC (if you’re old enough to remember those good old days).
So head over to the Discord website, open the Discord app and create an account.
Starting Your Midjourney Trial
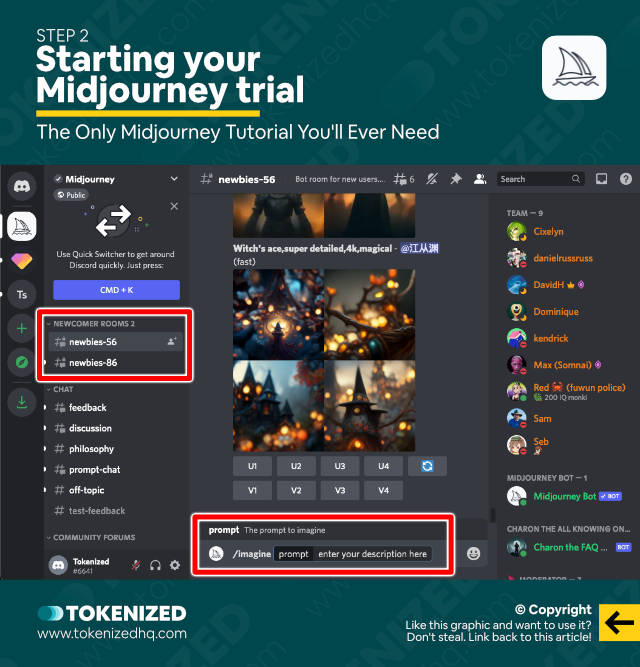
Once you’ve created your Discord account and logged into Discord, it’s time to start your Midjourney trial.
Click here to join the official Midjourney Discord server.
Once you’re inside the Discord server, join one of the so-called “#newbie” channels from the channel list on the left-hand side.
It doesn’t matter which one you choose, so for the sake of this Midjourney tutorial don’t worry too much about the numbers next to the name.
Next, it’s time to enter your very first prompt into the message field at the bottom of your screen.
Every new prompt in Midjourney starts with the /imagine command, followed by a string of words that make up your text prompt.
So let’s start off with something simple:
/imagine a cute and furry bunny rabbitGenerating the images will take about a minute.
As soon as you enter your very first prompt in Midjourney, the creation of your trial account is triggered.
Every trial account comes with 25 minutes of so-called Fast GPU time, which roughly translates to 25 sets of images.
Most people use up all of their trial credits shortly after reading this Midjourney tutorial.
So, if you’d like to learn more about how Fast GPU hours work and which Midjourney plans you can choose from after your trial ends, then check out our dedicated guides on those topics.
Variations & Upscaling
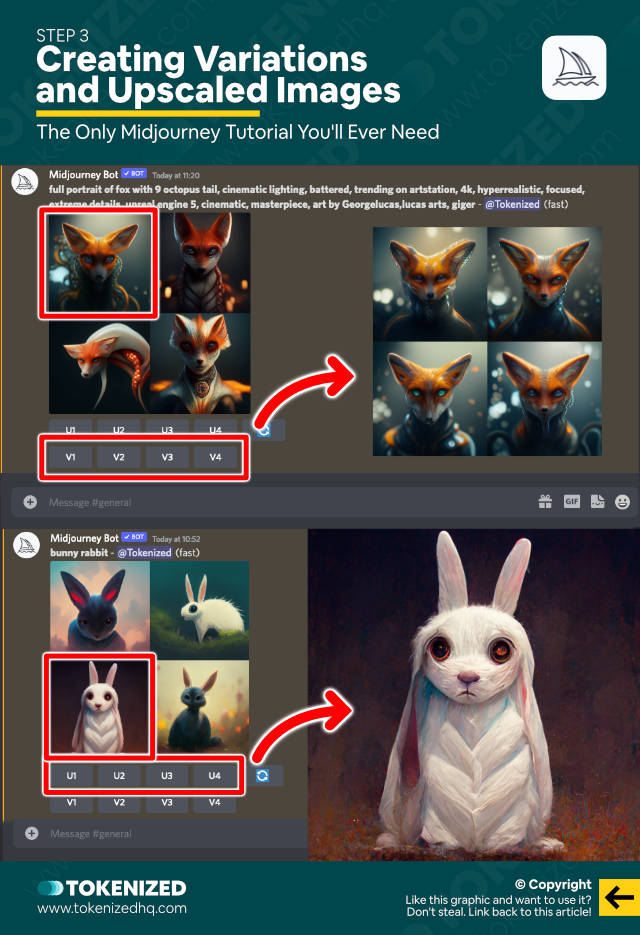
You’re probably wondering what all those buttons under your first set of images mean.
Well, it’s actually quite intuitive and we’ll quickly explain it to you as part of this Midjourney tutorial.
Every time you use the /imagine command, you are given a set of 4 images.
Each one of these images has a number from 1-4, starting from the top left one and then moving from left to right and top to bottom.
In other words:
- 1: Top Left
- 2: Top Right
- 3: Bottom Left
- 4: Bottom Right
Below the images, you have a total of 9 buttons that are used to continue working with this prompt.
The “U” buttons are used to “Upscale” any of the 4 images to a higher resolution (each upscale takes about a minute).
The “V” buttons are used to generate additional “Variations” based on the image you choose (each new set of variations takes about 20-30 seconds).
And the last button with the spinning arrows is called the “Re-Roll” button which basically enters the exact same prompt one more time and it will usually give you a completely new set of images.
This, in a nutshell, is how Midjourney works.
Writing Prompts
By far the most important skill when using AI art generators of any kind is your ability to write effective prompts.
And while we’ll cover the basics right here in this Midjourney tutorial, advanced prompting skills are something you can only learn over time.
Even though Midjourney uses Natural Language Processing and is pretty good at figuring out what you want, writing good prompts is an art form in itself.
There are many different ways how you can enter prompts and don’t let anyone ever tell you that you are doing it wrong.
Yes, certain outcomes can only be achieved by using a very specific approach, but there is no right or wrong with text prompts.
You can enter your prompts by listing a number of concepts or keywords:
/imagine a green landscape, a red farm house, big trees, blue skyBut you can also use actual phrases:
/imagine image of a green landscape and blue sky with a red farm house surrounded by big treesBoth of the prompts will give you vastly different results but Midjourney is able to understand both of them.
The length of your prompt does not determine how good the image will look.
Some of the best images come from extremely short prompts while others are the result of very elaborate prompts.
You also do not necessarily need to be as descriptive as in the examples above.
You can also choose something more creative, such as:
/imagine the endless serenity of country lifeThis won’t look anything like the first 2 prompts but it might look a lot more creative, with more dramatic lighting and different compositions.
Another very powerful aspect of prompting is the ability to define an art style.
So, for example, we could take the creative prompt and tell Midjourney to paint it in the style of Edward Hopper.
/imagine the endless serenity of country life, in the style of edward hopperAnd guess what, Midjourney will paint our new concept and try to apply the exact same style that was predominantly used by Edward Hopper.
We’re going to end our initial Midjourney tutorial here because based on our experience, this is the point where users need to start experimenting by themselves.
Your initial 25 credits will undoubtedly get used up rather quickly and you will have to decide whether you want to subscribe to a paid plan or not.
While we strongly advise that you do, we totally understand that it might be too expensive for some.
Key Points (tl;dr)
- Join the Midjourney Discord, enter your first prompt and start your trial to get started.
- Learn how different types of prompts produce very different results and do not limit yourself to the exact same structure every time.
- Pick deep dives for advanced skills from our Midjourney tutorial and improve your prompt game one step at a time.
Deep Dives for Skill Expansion
Obviously, learning how to use Midjourney does not end here and this Midjourney tutorial is meant to act as a pathfinder that will guide you toward more advanced skills as you get better.
By now you’ll probably have chosen one of the paid Midjourney plans, so it’s worth exploring some of the other concepts, commands, and parameters that you can apply in Midjourney.
In this section of our Midjourney tutorial, we’ll share an extensive list of features with very brief summaries of what they do.
We are not going to be prescriptive in terms of the order in which you should learn them.
Simply pick and choose what interests you the most and let yourself be guided by the process of learning.
Commands & Parameters
All Midjourney Commands in One Cheat Sheet
Midjourney Image Weight Explained
How to Create A Midjourney Video Timelapse
Explained: Midjourney Seed Command
How to Use the Midjourney Stop Command
Explained: Midjourney Weights for Text Prompts
How to Create Custom Midjourney Options
How to Change the DALL-E Aspect Ratio
Explained: Midjourney Chaos Parameter
Explained: Midjourney Negative Prompting
Explained: Midjourney Settings
How to Activate Midjourney Private Mode
Explained: Midjourney Stylize Parameter
Prompts
30+ Beautiful Midjourney Prompts That Will Blow You Away
The Top 5 Midjourney Prompt Generators & Builders
How to Combine Images in Midjourney
10 Midjourney Tips on Becoming a Master AI Artist
Styles
List of 2,000+ Midjourney Styles with Prompts
How to Create Midjourney Pixel Art
Inpainting & Outpainting
How to Use Midjourney Outpainting
How to Use Midjourney Inpainting
Upscaling
How to Maximize Midjourney Resolution for Prints
Explained: Midjourney Uplight Parameter
Explained: Midjourney Upscale Methods
Experimental Features
Explained: Midjourney Test & TestP Commands
Explained: Midjourney Creative Command
Explained: The Midjourney Remaster Feature
Explained: Midjourney Remix Mode
Patterns & Tiles
How to Create Midjourney Patterns & Tiles
Banned Words
Full List of Banned Words in Midjourney
Algorithm Versions
How to Use the Midjourney Algorithm Modifier
Why Midjourney V4 Is a Massive Game-Changer
Explained: Midjourney Niji Mode
Frequently Asked Questions (FAQ)
Before we close off this guide, let’s quickly address some of the most common questions related to Midjourney tutorials.
-
How do I access Midjourney AI?
You can access the Midjourney AI art generator by joining the official Midjourney Discord server and simply entering your very first prompt. This will trigger the creation of your trial account and generate your first set of images.
-
How do I use Midjourney?
To create an image in Midjourney you must enter the
/imaginecommand followed by your text prompt. There is no right or wrong way to write your prompts. You can enter keywords, phrases, or even prose. We strongly recommend check out our dedicated Midjourney tutorial to learn more. -
How do you draw in Midjourney?
Midjourney is not an image editor like Adobe Photoshop or Affinity Designer. Instead, it is a text-to-image AI art generator. Images are essentially created by describing what you would like to see.
Conclusion
Even though many people think that AI art generators like Midjourney make it incredibly easy to create stunning artwork, it’s not as easy as you might think.
Indeed, pretty much anyone can create amazing images at random by simply entering a prompt that happens to turn out really great.
However, you can separate the wheat from the chaff by looking at who is actually able to create something very specific on purpose and not simply by chance.
A good Midjourney tutorial will go a long way in putting you on the right path towards prompt mastery.
Here at Tokenized, we want to help you learn as much as possible about the AI software industry. We help you navigate the world of tech and the digitalization of our society at large, including the tokenization of assets and services.


