So you want to learn how to use Midjourney inpainting?
Creating awesome AI-generated artwork with Midjourney can feel like the ultimate cheat code to creative inspiration.
But that feeling quickly comes to a grinding halt whenever you’re confronted with one of Midjourney’s rather “strange” errors or a minute detail in the image becomes a massive annoyance.
In this guide, we’ll show you how you can edit your Midjourney images by using inpainting features.
Let’s dive right in.
Table of Contents Show

Like this content? Then share it!
How to Use Midjourney Inpainting
www.tokenizedhq.com
Here’s the answer. Great article by @ChrisHeidorn right here: https://tokenizedhq.com/midjourney-inpainting/
How to Use Midjourney Inpainting
Let me be straight with you.
The title of the article is a bit misleading because it sort of implies that there is an inpainting feature in Midjourney.
Unfortunately, Midjourney inpainting still doesn’t exist.
Just like Midjourney outpainting still isn’t really a thing, inpainting is one of those features that every Midjourney fan would love to see sooner rather than later.
However, you’ll be happy to hear that the Midjourney team has mentioned in their office hours that they planning on releasing an inpainting feature quite soon.
What does “quite soon” really mean? Well, no one knows, but I’m quite confident that we might see inpainting and outpainting in v6 or v7.
Sure, there’s a Remix feature that allows you to “build on top” of an existing image, but it’s proven to be quite unreliable and it’s simply not the same thing.
You see, it’s quite frustrating to know that you’re using one of the most advanced AI art generators in the world, but for some reason, it doesn’t support certain features that its competitors have had for quite some time.
And even though we’re absolutely positive that the Midjourney team has these features planned in some shape or form, no public announcements have been made so far.
But luckily that doesn’t mean that you can’t edit your images using AI.
It just means that you’ll have to use a different set of tools.
And in this particular case, we’ll show you how it’s done with DALL-E 2.
The main reason why we’ve chosen to use DALL-E is that it’s the quickest, easiest, and most powerful option there is right now.
And since every account gets at least 15 free credits per month, it’s something you can easily try out right now.
Sure, you could install Stable Diffusion and do it for free.
But let’s face it, the installation process is still an absolute nightmare.
Key Points (tl;dr)
- Midjourney currently does not support “inpainting” features natively.
- However, you can still inpaint or edit your images from Midjourney using other AI art generators such as DALL-E or Stable Diffusion.
- The quickest and easiest way to try this out is by using DALL-E 2’s online editor.
Midjourney Inpainting with DALL-E 2
Thanks to the beautiful simplicity of the DALL-E editor, Midjourney inpainting is extremely easy to do.
And even though you could probably explain how to do it in just a few bullet points, we’re going to give you a step-by-step walkthrough of how to edit your Midjourney images in DALL-E 2.
So here’s how you do it.
Step 1: Download Your Midjourney Image

First of all, pick the image that you would like to edit or correct and download it to your desktop.
If you haven’t upscaled it yet, I strongly recommend you do so first and then download the higher-resolution version of the image.
Technically, you could also use the half-sized images that Midjourney generates, but you want to give the DALL-E AI as much data to work with as possible.
Also, your end result will also be a much bigger image.
Step 2: Import the Image to the DALL-E 2 Editor
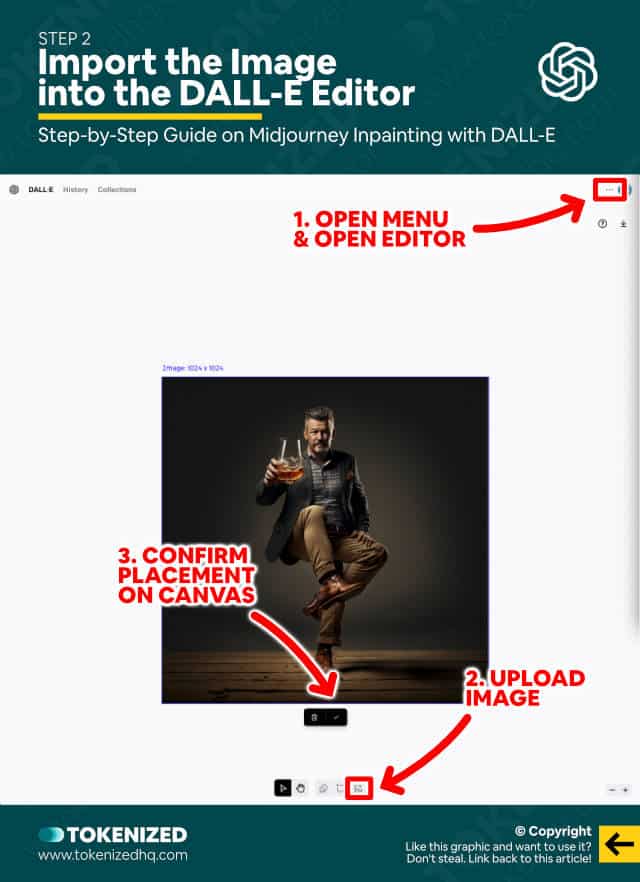
Once you’ve got your image, log into your DALL-E account and select “Try Outpainting (Open Editor)” from the 3-dot menu in the top right corner.
If you don’t have an account yet, just create a new one.
You’ll even get 50 free credits as a welcome bonus, which is more than enough to do some Midjourney inpainting on dozens of images.
Once the editor loads, click the “Upload Image” button in the toolbar at the bottom of the screen and select your Midjourney image.
The editor will load the image and you will have to confirm its placement on the canvas by clicking the checkmark below it.
Once that’s done, a text field for your prompts will appear at the top.
Step 3: Erase Part of the Image
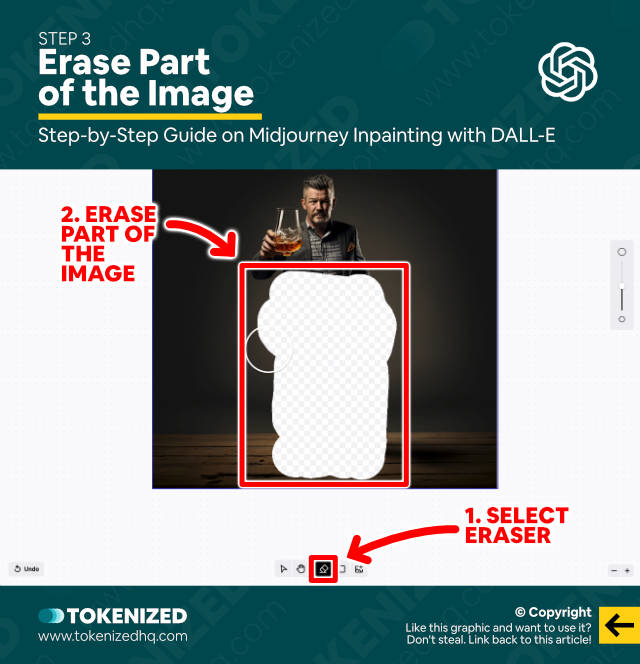
Next, identify the exact issue or mistake that you want to change or fix.
In this first example of a man toasting with a whiskey glass, there’s something wrong with his feet.
You may have noticed the weird piece of leather that seems to be protruding from his leg or shoe about halfway down.
I also don’t like that he seems to be dancing (not sure what Midjourney was thinking here).
So what I’ll do is I’ll use the “Eraser” tool to remove his entire lower body from the chest down.
You don’t need to erase that much if you only want to change a detail, but I would also like to change his entire pose.
Step 4: Enter a Prompt & Generate
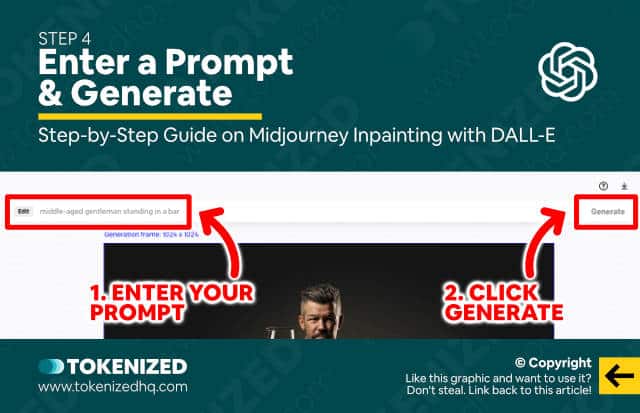
This next step is important because there are different ways of writing your prompts when you’re trying out Midjourney inpainting.
Had I wanted to add something to the image that didn’t exist before (like an object), then I probably would have erased a smaller area.
I then would have focused my prompt on only describing the new object that I want to add.
I’ll show how that’s done in another example later in this article.
But right now, I’m making quite a significant change to the overall image.
Therefore, I’m going to describe the entire scene in my prompt.
middle-aged gentleman standing in a barDon’t forget to hit the “Generate” button.
Step 5: Pick a Variation
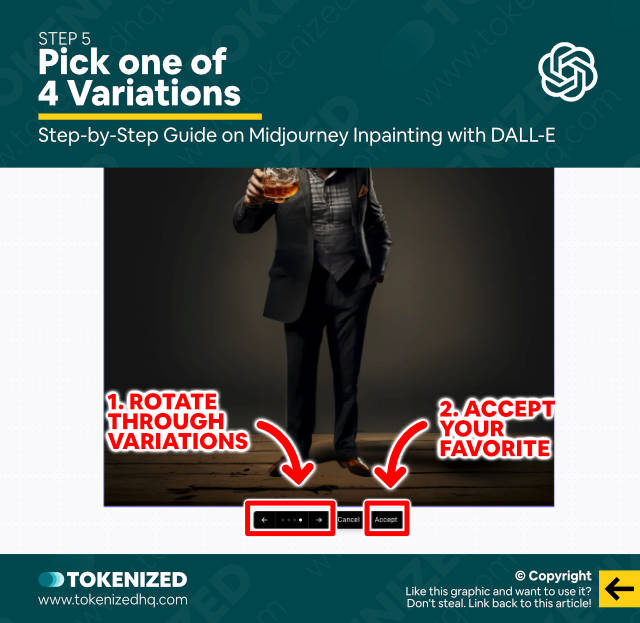
After 10-20 seconds DALL-E will display 4 variations that you can choose from.
By the way, every command costs 1 credit and will give you 4 variations to choose from (similar to Midjourney).
Now, as great as this feature can be, you’ve probably noticed that there’s a caveat.
DALL-E actually did a great job.
The only problem is that the filled-in area isn’t as detailed as the Midjourney image.
And while this isn’t a big issue in this particular case, it might be in other examples.
This is one of the weaknesses of Midjourney inpainting with tools such as DALL-E.
You’re limited by the capabilities of the external tools you use.
Step 6: Download the Inpainted Image

Anyway, when you’ve decided on a variation, click the “Accept” button to confirm.
Once you’re happy with the final image, you can download it to your computer in full size by clicking the “Download” button in the top right corner of the editor.
Step 7: Image Prompt in Midjourney (Optional)
In cases where the inpainted art style doesn’t match the rest of the image, you can try to re-create the image in Midjourney.
So what you would do is use the inpainted image from DALL-E 2, upload it to Midjourney, and then use it as an image prompt.
Your text prompt would have to be similar to or close to the original one.
Mind you, this doesn’t always work because Midjourney sometimes stubbornly refuses to produce certain types of compositions (don’t we hate it!?).
Adding a Small Detail with Midjourney Inpainting
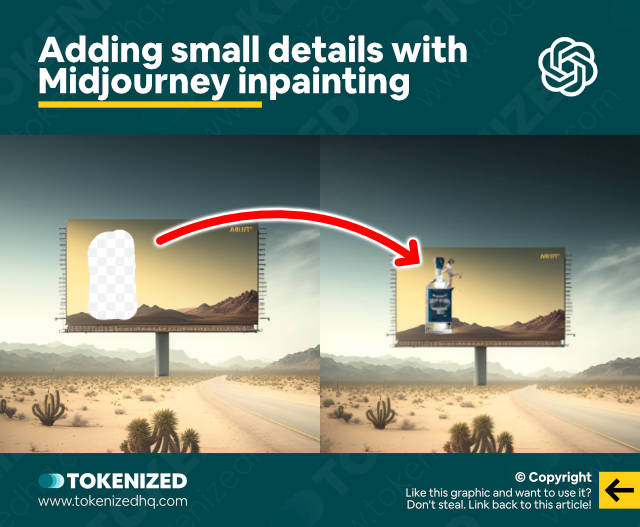
We promised to show you another example of Midjourney inpainting in DALL-E 2.
In this particular case, we wanted to add an ad for a custom gin brand onto the billboard’s canvas.
So this time we only erased a specific part of the billboard itself, entered our prompt, and hit “Generate”.
bottle of ginMidjourney inpainting can be tricky and not everything always works out as you think.
Be careful how much to erase because it has a huge impact on how the AI will interpret what you are trying to achieve.
Frequently Asked Questions (FAQ)
Before we close off this guide, let’s quickly address some of the most common questions related to the Midjourney inpainting.
-
How can I edit an image in Midjourney?
Midjourney currently does not support any specific image “editing” features. While image prompts and Remix mode can be used to make adjustments, every prompt will produce an entirely new set of images. The only way to achieve something similar to Midjourney inpainting is by editing it in another AI art generator such as DALL-E 2 or Stable Diffusion.
-
What is inpainting?
Inpainting is the process of editing or replacing a portion of an image with the help of a prompt-based AI art generator.
-
Does Midjourney support inpainting?
There currently is no native support for Midjourney inpainting. However, you can import upscaled images from Midjourney into other AI art generators that do and edit your images there (e.g. DALL-E or Stable Diffusion).
-
What tools can I use to edit Midjourney images?
The two most popular alternatives to Midjourney that offer image editing capabilities such as inpainting or outpainting are DALL-E 2 and Stable Diffusion.
Conclusion
Let’s face it, with or without inpainting, Midjourney is still the coolest kid on the block when it comes to the quality of its images.
And it’s probably just a matter of time before we finally get an official Midjourney inpainting feature.
But until then, Adobe Photoshop or another AI art generator will have to suffice.
Here at Tokenized, we want to help you learn as much as possible about the AI software industry. We help you navigate the world of tech and the digitalization of our society at large, including the tokenization of assets and services.


