So you want to learn how to use Midjourney outpainting?
Creating AI-generated artwork in Midjourney using nothing but your prompting skills is already loads of fun and provides nearly limitless possibilities.
But wouldn’t it be nice if you could outpaint your images and expand them far beyond the limits of what Midjourney generates out-of-the-box?
In this guide, we’ll show you how you can apply outpainting tools to your Midjourney images.
Let’s dive right in.
Table of Contents Show

Like this content? Then share it!
How to Use Midjourney Outpainting
www.tokenizedhq.com
Here’s the answer. Great article by @ChrisHeidorn right here: https://tokenizedhq.com/midjourney-outpainting/
How to Use Midjourney Outpainting
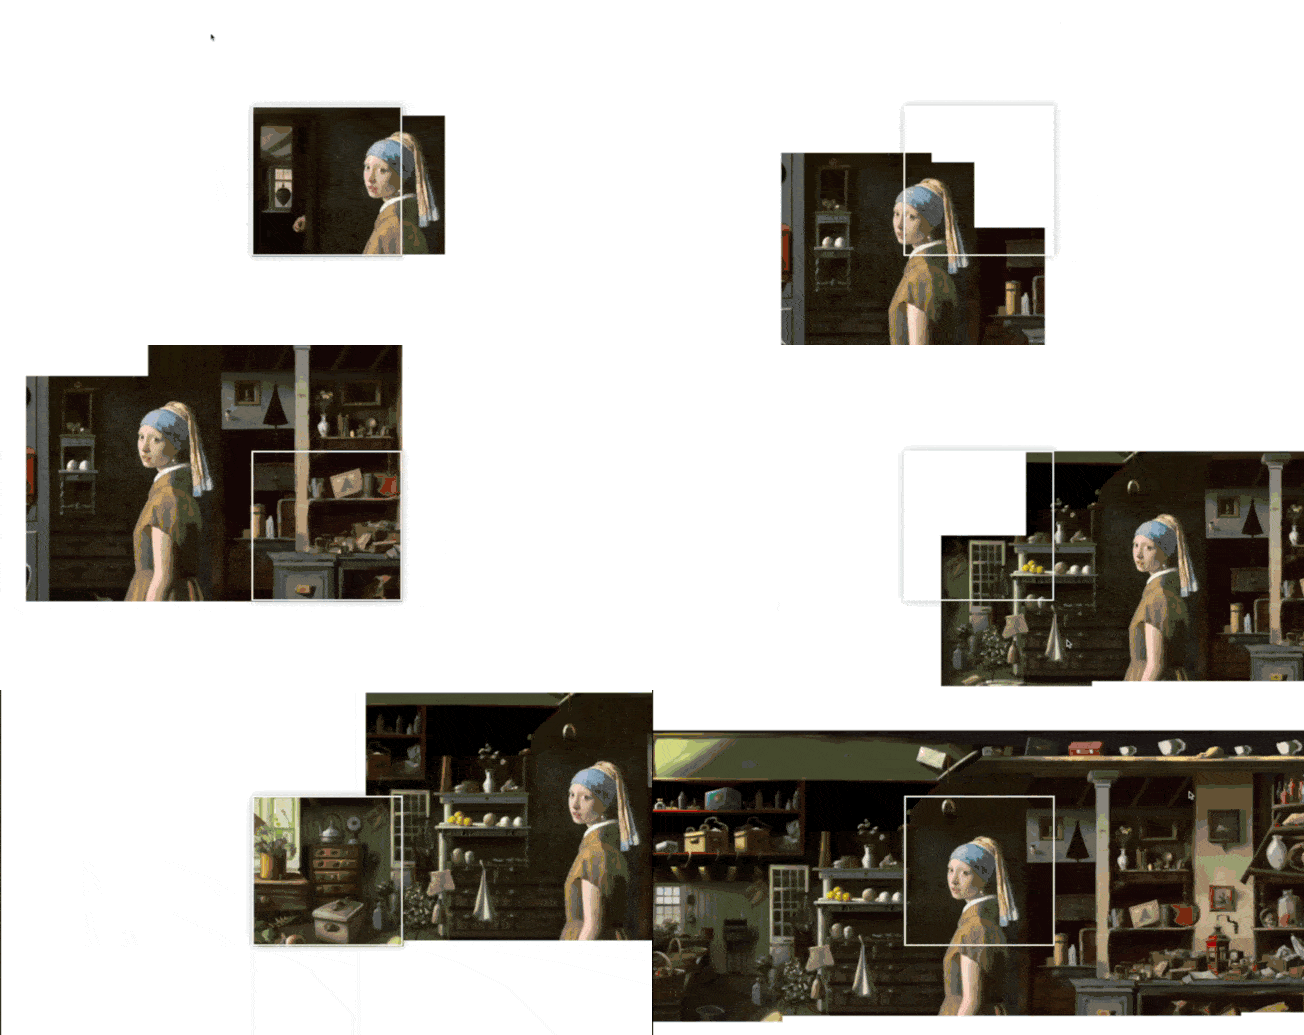
The wait is finally over!
Midjourney has finally added three new features and they are the very first steps towards giving users a complete set of Outpainting tools.
They’re a bit different from what you’d usually consider “Outpainting”, but they do some of the same things Outpainting does.
So let’s have a quick look at these new tools.
The first feature is “Zoom Out”, which comes with two settings: “Zoom Out 2x” and “Zoom Out 1.5x”.
With them, you can make your image look like you’ve taken a step back, showing more of the scene and widening your field of view.
Next, there’s “Custom Zoom”, which was clearly built for some of the more advanced users among you.
This feature allows you to pick your own zoom level, anywhere between 1 and 2, and it even lets you change the aspect ratio too.
It’s like having some of the fancy bits of Outpainting, but without needing an actual paintbrush.
Last but not least, there’s “Make Square”, which changes a rectangular image into a square by filling the space around its edges.
Bear in mind that none of these features actually increase the resolution of the image, they just fit more content into the same amount of megapixels.
With these new tools, Midjourney is making it easier for you to do more with your images, just like with Outpainting.
For a more detailed overview of each one of the new features, make sure to check out my dedicated article on Midjourney Zoom.
It covers everything you need to know.
Now, as great as these new features are, we’re still waiting for the implementation of Midjourney inpainting.
Unfortunately, I don’t think we’ll see Inpainting before v6.
Key Points (tl;dr)
- Midjourney finally supports a rudimentary form of “outpainting” features natively.
- “Zoom Out” and “Make Square” aren’t exactly the same thing but they’re an important step in the right direction.
- However, you can still outpaint your Midjourney images using other tools such as DALL-E or Stable Diffusion.
Midjourney Outpainting with DALL-E 2
If you’re still not happy with these new features and specifically want that “painting” experience, you can outpaint your Midjourney images with other tools.
The quickest and easiest way to test this out is by using the DALL-E 2 outpainting feature that’s built right into its online editor.
We’ll talk about some of the other alternatives a bit later in this article but we’ll use DALL-E to demonstrate how it’s done.
And since every DALL-E account comes with at least 15 free credits per month, there’s no initial cost to you either.
If you don’t already have an OpenAI or DALL-E account, make sure you head over to the DALL-E 2 website and create one.
Your account will be set up in no time and every account comes with a free trial.
Once you’re ready, the process of Midjourney outpainting in DALL-E 2 is incredibly easy.
Here’s a quick step-by-step tutorial on how to do it.
For a more detailed explanation of how DALL-E outpainting works, check out our dedicated guide.
Step 1: Download Your Midjourney Image
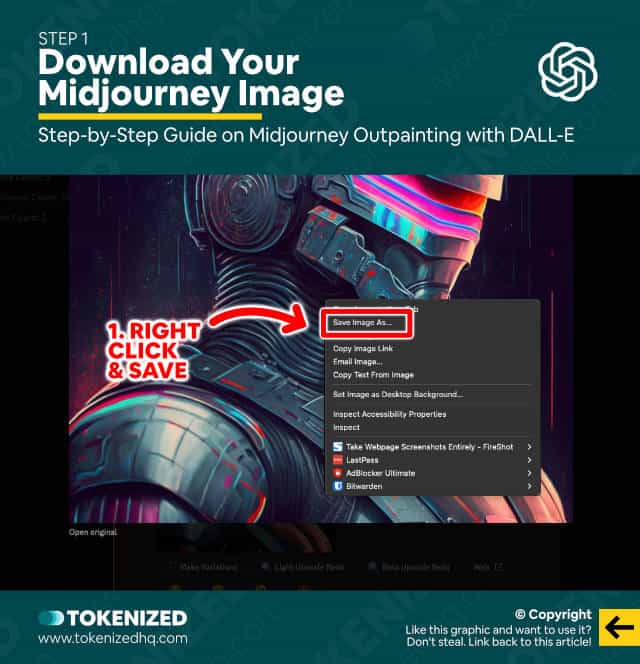
Pick one of your Midjourney images that you would like to expand into a larger scene.
It might seem intuitive to use an upscaled version of your image, however, this is necessarily always the case.
An upscaled image might end up being considerably larger than the maximum frame size that the outpainting tool can generate.
If the frame to too small compared to the source image, you might find it difficult to outpaint in a way that maintains a coherent image.
This isn’t a strict rule and will require some trial and error.
For DALL-E, you can comfortably use the upscaled version.
Step 2: Import the Image to the DALL-E 2 Editor
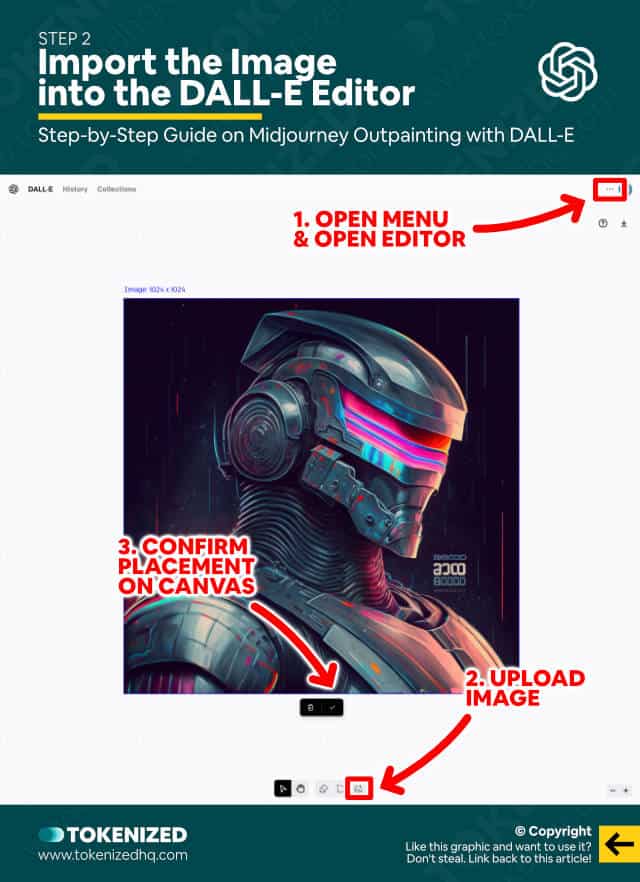
Next, log into your DALL-E account and select “Try Outpainting (Open Editor)” from the 3-dot menu in the top right corner.
Once the editor loads, click the “Upload Image” button in the toolbar at the bottom of the screen and select your Midjourney image.
The editor will load the image and you will have to confirm its placement on the canvas by clicking the checkmark below it.
I recommend making sure that the image has snapped onto the canvas guides since this will make expanding the image a lot cleaner later one.
Step 3: Place the Generation Frame
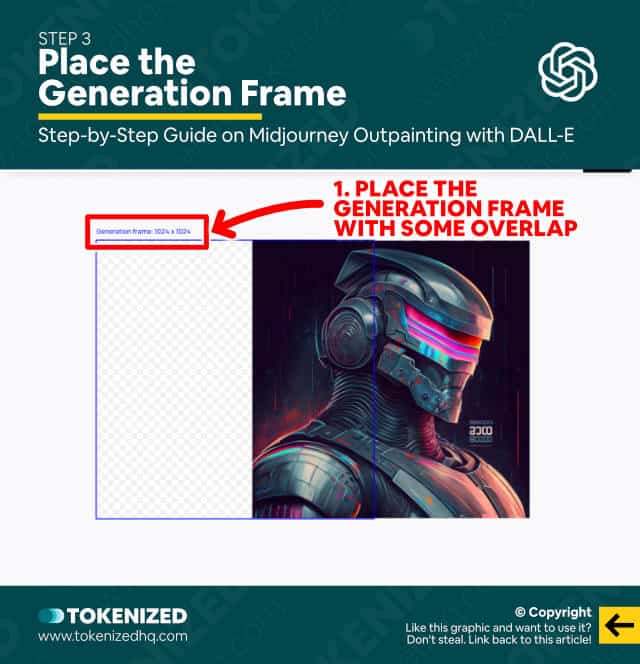
Now you must place the DALL-E generation frame somewhere outside the source image.
While you can technically place it right adjacent to the outer limits of the image, it’s advisable to have at least some overlap.
The more overlap there is, the better the additional frame will blend into the existing image.
Step 4: Enter a Prompt & Generate
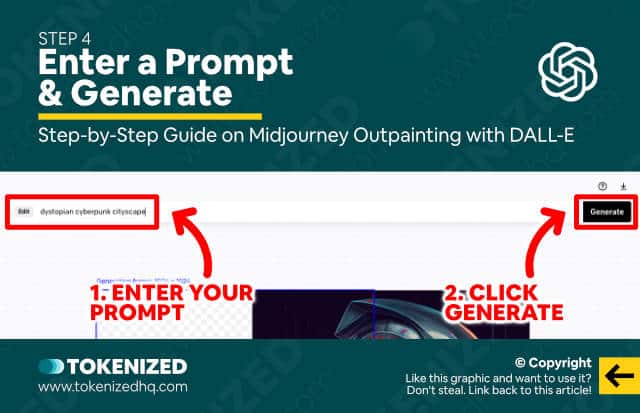
Once you’ve decided on a frame that you would like to outpaint, enter a prompt that describes the content it should have.
Remember, at this stage, you do not have to describe what your Midjourney image contains, but rather what the new frame should primarily contain.
When you’ve decided on a prompt, click on “Generate”.
Step 5: Pick a Variation
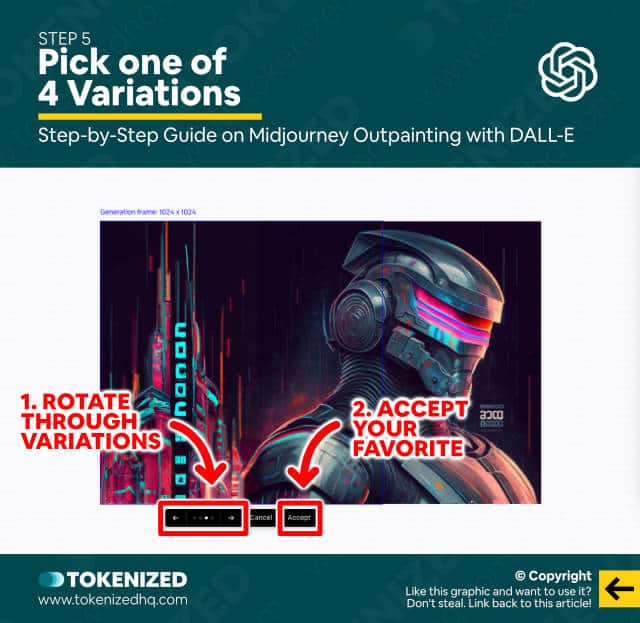
After 10-20 seconds the contents of the frame will be filled by DALL-E.
Every generation costs 1 credit and produces 4 different image variations, very much as Midjourney does.
Use the arrows to rotate through all 4 images, pick the one that you like best and click “Accept”.
Rinse and repeat steps 3-5 until you’re happy with your Midjourney outpainting result.
The quality of your results ultimately depends on your prompting skills.
Step 6: Download the Outpainted Image
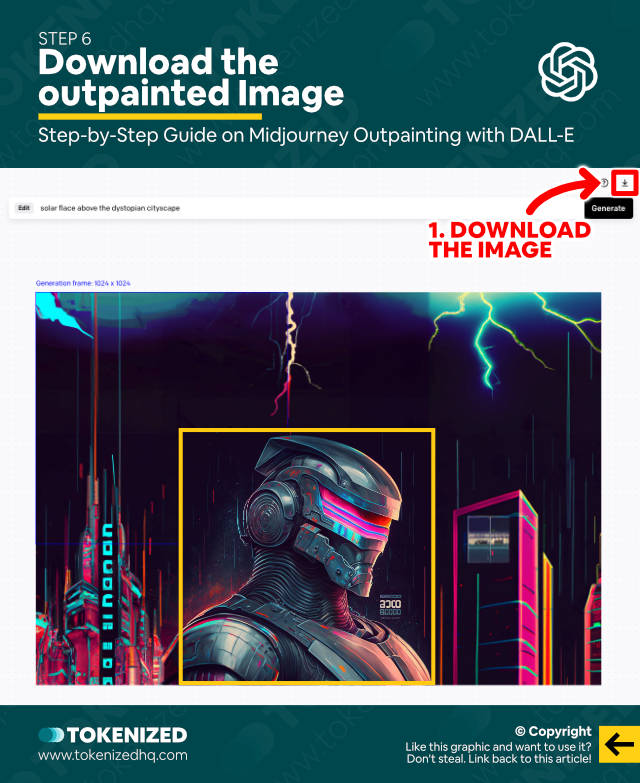
Once you’re happy with your final result, you can download the outpainted image by clicking the “Download” icon in the top right corner.
Congratulations, you’ve completed your first attempt at Midjourney outpainting!
And from here, you can either use it as an image prompt in Midjourney once more or use an AI upscaler to increase its resolution to a print-friendly size.
Midjourney Outpainting with Stable Diffusion
So in the example, above we showed you how to easily use Midjourney outpainting with some help from our friends over at OpenAI.
The problem with this approach is that DALL-E 2 isn’t free.
Sure, you get some free credits, but if you want to do this on a regular basis, DALL-E credits become rather expensive in the long run.
The obvious alternative to this is to use Stable Diffusion, given that it’s open-source and therefore 100% free (at least in theory).
Our primary “beef” with Stable Diffusion is that seemingly not a single Product Manager or UX Specialist was involved in its development.
Sure, it’s free to use, but unless you’re a developer, you’re going to absolutely despise the installation process.
The incredibly bad user experience is preventing Stable Diffusion from going mainstream.
We’ve actually written an article on how to install Stable Diffusion on MacOS, but it really only covers the really simple options such as Diffusion Bee.
Although we’ve managed to get Invoke AI (an implementation of Stable Diffusion) up and running, it wasn’t a particularly enjoyable experience.
The road to setting everything is paved with tons of pitfalls and potential errors that will make you go mad.
That being said, once you do finally get it to work, you can use Stable Diffusion’s outpainting feature for free.
And it works very much the same way as in DALL-E 2, except that you’re confronted with a slightly more complex user interface.
Frequently Asked Questions (FAQ)
Before we close off this guide, let’s quickly address some of the most common questions related to the Midjourney outpainting.
-
How can I expand a Midjourney image?
Midjourney does not support outpainting natively, however, you can download your images and import them into another AI art generator that does (e.g. DALL-E 2). Alternatively, you can attempt to achieve a similar result as Midjourney outpainting by experimenting with prompts that tell the AI to “zoom out” of the scene.
-
What is outpainting?
Outpainting is the process of taking a source image and incrementally adding frames of AI-generated image content around its borders. This approach allows you to create much bigger images and scenes that otherwise would be difficult via prompting.
-
Does Midjourney support outpainting?
Unfortunately, there is currently no Midjourney outpainting feature. And while it is likely that the team is working on building such capabilities into Midjourney, no public announcements have been made so far.
-
What tools can I use to outpaint Midjourney images?
You can use any AI art generator that supports outpainting to expand your Midjourney images. This includes paid alternatives such as DALL-E but also open-source tools like Stable Diffusion. Midjourney outpainting is still possible, even if it doesn’t have such as feature itself.
Conclusion
Midjourney outpainting is probably one of the most requested features within its community of fans.
Outpainting opens up near-limitless possibilities and truly catapults AI art generators to another level.
And while Midjourney itself still does not natively support this feature, you can already expand your existing Midjourney images today.
Here at Tokenized, we want to help you learn as much as possible about the AI software industry. We help you navigate the world of tech and the digitalization of our society at large, including the tokenization of assets and services.


