Want to learn how to use DALL-E 2 and all of its features?
You’ve probably seen some of the crazy images that people have created with DALL-E by simply entering a few words and hitting a button.
But what if I told you that DALL-E 2 is capable of so much more once you understand how all of its features really work?
In this guide, we’ll show you how to use DALL-E to create stunning images, including adding and removing objects to create exactly the result you are looking for.
Let’s dive right in.
Table of Contents Show
Like this content? Then share it!
How to Use DALL-E 2 to Create Beautiful Artwork
www.tokenizedhq.com
Here’s the answer. Great article by @ChrisHeidorn right here: https://tokenizedhq.com/how-to-use-dall-e/
How to Use DALL-E 2
Before I start explaining how to use the different functionalities that DALL-E 2 has to offer, I’m going to assume that you have already created an account on the DALL-E website.
If you haven’t done that yet, please visit the official DALL-E website and sign up for an account.
Your account will be awarded an initial pack of 50 free credits that expire after 30 days.
In subsequent months you’ll receive a new free allocation of 15 credits.
Of course, you can always add more by purchasing more credits.
For more details on DALL-E’s pricing model and the cost of credit, please refer to our dedicated guide.
Now let’s get started.
Key Points (tl;dr)
- DALL-E 2 is already capable of creating amazing images from very simple text prompts.
- However, its true potential is only unleashed once you fully understand how to use DALL-E’s various advanced features and write effective prompts.
- Editing existing images has never been easier and will likely change the way we work.
How to Write Effective Prompts
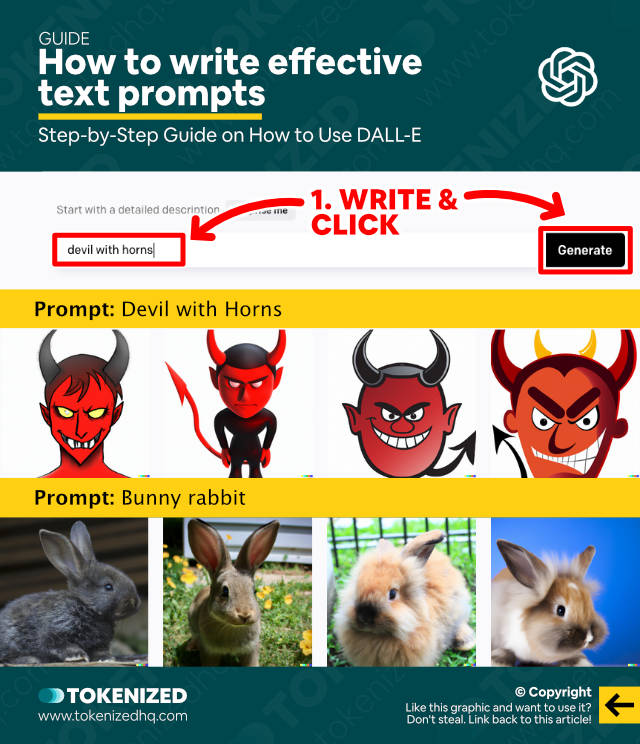
On the main screen of the DALL-E 2 web app, you’ll see a text field where you can enter your prompt as well as a “Generate” button.
For the purpose of this guide, we’re going to focus on how to use DALL-E to create and edit images directly within DALL-E.
If you want to edit existing images that you have, please refer to our article on how to upload images to DALL-E.
To create an image in DALL-E, you must enter a text prompt and hit the “Generate” button.
Anyone can easily generate images with very simple prompts such as:
- “devil with horns”
- “bunny rabbit”
As you can see in the image above, the results are quite good, but they might not be what you expected.
For example, the first prompt resulted in images that look very cartoonish and almost like clip art.
Most people wouldn’t consider them to be very good images despite the fact that they were created out of thin air.
This is because DALL-E probably wasn’t trained with any “real” images of devils.
And how could it? Devils aren’t real.
If we look at the image of the second prompt, the story is quite different.
We see 4 photo-realistic images of rabbits because DALL-E was probably trained with a dataset that included tons of photos of rabbits.
In both cases, the result doesn’t necessarily fit what I was looking for.
One way of fixing this is by adding a lot more detail to your prompts and being more descriptive.
So for example, our original prompts could be changed into:
- “An evil devil with horns sitting on a throne in hell”
- “The face of a cute bunny rabbit with big white ears”
You’re almost guaranteed to get very different results with those prompts.
But what if I have a very specific art style in mind?
Could I influence that too?
How to Apply Art Styles to Prompts
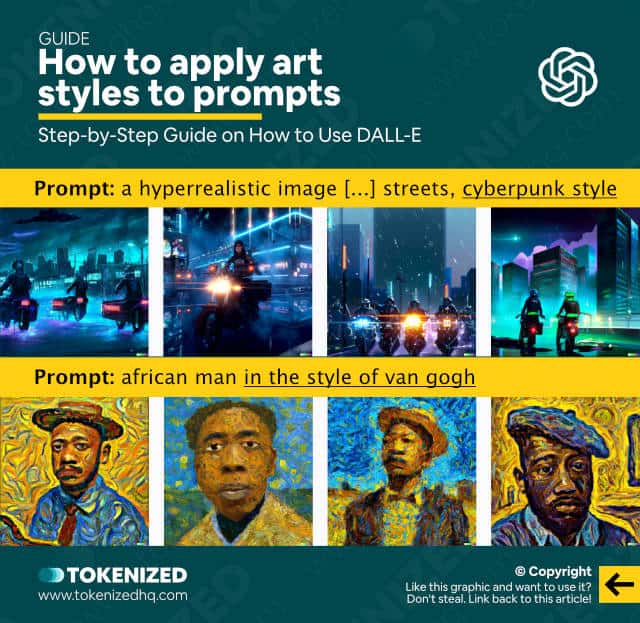
One of the most amazing things about nearly all of the new AI art generators that are hitting the market is the fact that they support various types of art styles.
But many new users just don’t know how to use DALL-E 2 to create such images.
If you wanted to generate an image that looks like an oil painting, you can easily do that.
Or if you’re a huge anime fan, you could easily have your prompt drawn in that particular style.
Let me show you an example of a highly descriptive prompt that includes a reference to an art style:
a hyperrealistic image of dystopian city landscape, futuristic police officers on glowing motorcycles drive through the streets, cyberpunk styleNotice the last part with “cyberpunk style”?
The entire first part of the prompt could have been interpreted in many different ways.
However, by adding the style reference, I’m able to generate images like the ones you see in the image above.
And guess what? We can take this one step further because DALL-E 2 even knows the art styles of famous artists.
The following prompt will emulate the art style of Vincent van Gogh:
african man in the style of van goghIf you check out the results above, the images are shockingly close to the paintings that van Gogh actually produced.
How to Add Objects to an Image
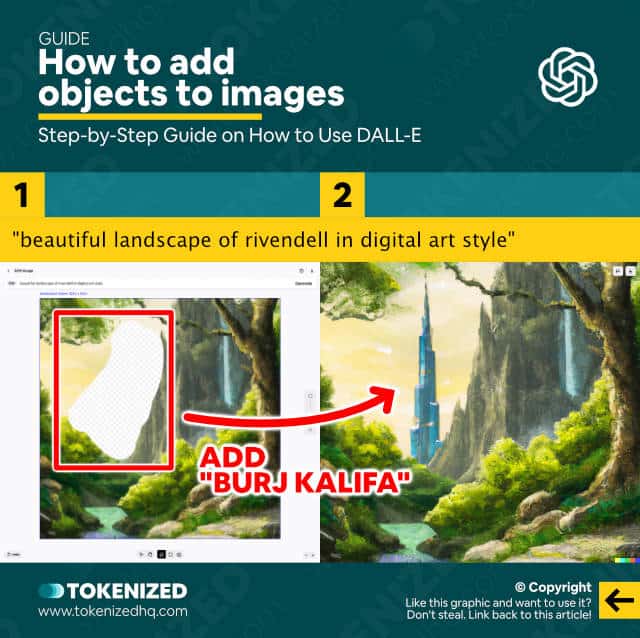
Writing extremely elaborate prompts is a lot of fun, however, there’s always an element of randomness in the results that DALL-E generates.
Luckily, there’s a special feature in DALL-E called Inpainting.
It allows you to manipulate an image with AI and I’m going to show you how to use DALL-E 2 to add an object to an image.
Let’s start off with a simple digital art prompt:
beautiful landscape of rivendell with a telecommunications tower in the background in digital art styleWhat we get is a pretty little landscape like you might see in any other fantasy comic.
But now I want to add a slightly “random” object to the image while still maintaining the overall style.
So I click the “Edit image” button which opens the images in DALL-E’s built-in editor.
I then select the “Eraser” tool and remove the sections of the image where I want to place the new object.
Next, I enter an entirely new prompt that describes the specific object that I would like to add.
In this case, I’ll use "Burj Kalifa tower" and hit the “Generate” button.
After a few seconds, I see the results, and lo and behold, the Burj Kalifa tower has been added to my fantasy scene.
How to Remove Objects from an Image
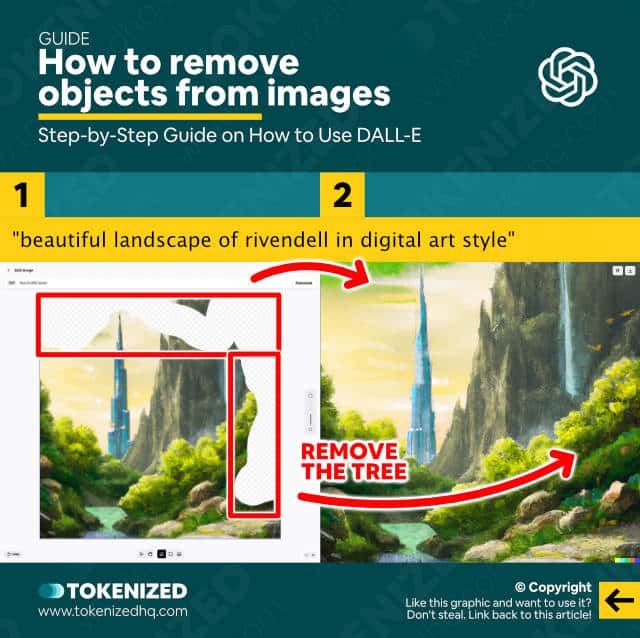
Alright, so now that we have this new object in the image, I’m still not entirely happy.
I actually want to get rid of the tree that’s covering a lot of the foreground.
I will now show you how to use DALL-E 2 to remove objects from an image as well.
We’re going to continue with the image we just edited.
Using the “Eraser” tool, I remove all of the sections where parts of the tree are visible.
Once I’m done, I need to enter a new prompt again.
Technically, I could now enter an entirely different prompt but I’m simply going to re-use the exact same prompt that created the original image.
beautiful landscape of rivendell with a telecommunications tower in the background in digital art styleThe important thing is that your prompt describes the overall images that you want to generate at the end.
After hitting “Generate” and waiting a few seconds, DALL-E will give me 4 image variations that do not include the tree.
Amazing, isn’t it?
How to Expand Images with Outpainting
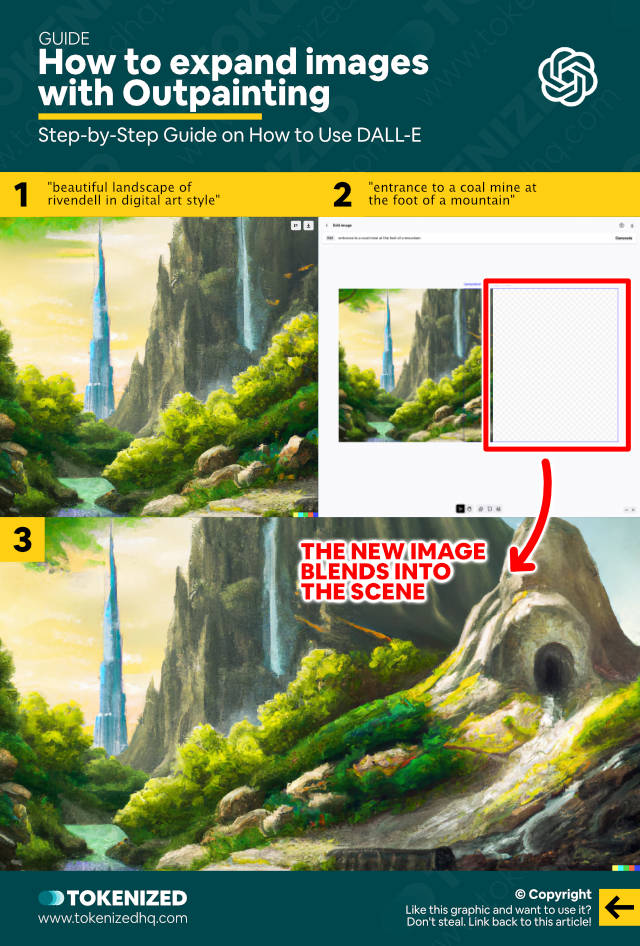
One of the more annoying aspects of DALL-E is that you can still only generate square images of 1024×1024 pixels.
Not only does it make it impossible to change the default DALL-E aspect ratio but the resolution also isn’t particularly big.
However, DALL-E 2 has another amazing feature that sets it apart from other competitors, such as Midjourney.
I’m now going to show you how to use DALL-E’s Outpainting feature to expand images beyond their existing borders.
Outpainting enables users to build (or “paint”) much bigger images by adding new content frame by frame.
As you can see in the image above, you place the generation frame on the out rim of the source image, so that it overlaps slightly.
You then enter a new text prompt that describes what you want to see in that frame.
DALL-E will then automatically blend it into the scene and the style of the existing image.
As amazing as this feature is, it’s also quite expensive because every frame will cost you a credit.
How to Zoom Out with Uncrop
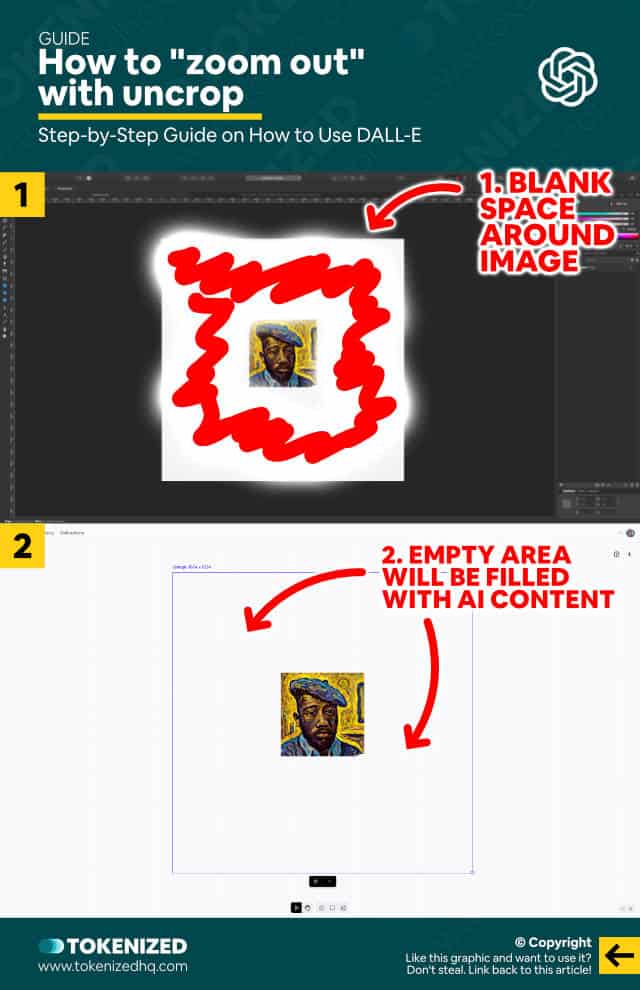
Another method of enlarging the scene of an image in DALL-E is using the unofficial uncrop feature.
What this does is it adds new content all around the original source image.
It is often compared to “zooming out” and I’ll show you how to use DALL-E to do this as well.
However, you’re going to need an external image editor (e.g. GIMP) to do so.
Start off by creating a new 1024×1024 canvas with a transparent background in your image editor.
Then place your source image somewhere on the canvas, but make sure you reduce its size compared to the overall canvas.
Save that file as a transparent PNG and upload it to DALL-E’s editor.
You’ll notice that the source image is much smaller than the generation frame itself.
Now you must enter a text prompt that describes the overall image that you would like to create and hit “Generate”.
DALL-E will use the source image as well as your text prompt to fill the empty space with new content and make sure that it blends together perfectly.
Frequently Asked Questions (FAQ)
Before we close off this guide, let’s quickly address some of the most common questions related to learning how to use DALL-E.
-
How do I get access to DALL-E?
To get access to DALL-E, visit the official DALL-E website and sign up for a free account. Once you’ve verified your account, you will receive 50 free credits that you can use to generate images.
-
How does DALL-E work?
DALL-E 2 is a text-to-image AI art generator. Images are generated based on your own descriptions and objects, scenes, and styles. Your words are interpreted using OpenAI’s GPT-3 model and DALL-E then generates new images that it believes best represent your input.
Conclusion
As amazing as AI art already is, we’re only at the beginning of a technological revolution that will disrupt careers, create new ones, and boost productivity in ways we never would have imagined.
It’s important not to sleep on this and even if you do not pursue a career in this space, at least make sure you understand how it works and what the technology can do.
Here at Tokenized, we want to help you learn as much as possible about the AI software industry. We help you navigate the world of tech and the digitalization of our society at large, including the tokenization of assets and services.


