Want to learn more about how DALL-E Inpainting works?
Throughout 2022 we’ve been introduced to many new AI art generators capable of producing astonishing results by merely entering a few words.
However, one of the most exciting features is the “Inpainting” feature in the new DALL-E 2 web application that allows you to add or remove objects from an image.
In this guide, we’ll show you what inpainting is and how you can use it to manipulate images using the DALL-E AI.
Let’s dive right in.
Table of Contents Show
Like this content? Then share it!
DALL-E Inpainting Explained
www.tokenizedhq.com
Here’s the answer. Great article by @ChrisHeidorn right here: https://tokenizedhq.com/dall-e-inpainting/
What is the DALL-E Inpainting Feature?
Since “inpainting” isn’t an actual word according to the dictionary, there seems to be some confusion about what it actually is.
We need to give some credit to OpenAI‘s marketing team because it’s an excellent example of very effective product branding by inventing a new term for a feature.
The DALL-E Inpainting feature effectively stands for “painting IN an image”, or in other words, modifying an existing image.
This image can either have been created using DALL-E or you can also upload existing images that you want to manipulate.
Inpainting lets you remove parts of the image or also add new ones, giving the user an unprecedented level of control over what he can create.
All you need to do is open the DALL-E image editor, erase the part of the image you want to change, and enter a new prompt that describes what DALL-E should put in its place.
If that sounds a little too abstract for you, don’t worry.
We’ll explain everything in detail in the sections below.
Key Points (tl;dr)
- The DALL-E inpainting feature is an absolute game-changer because it allows anyone with rudimentary image editing skills to manipulate entire images at will.
- Existing or newly created images can be edited into masterpieces by simply masking parts of the image and choosing the right words to describe new objects.
- Even removing unwanted elements or sections of an image is shockingly easy since DALL-E will simply fill the gaps.
How to Add Objects to an Image in DALL-E 2

Imagine you wanted to create an entirely new image from scratch and use DALL-E to generate something for you.
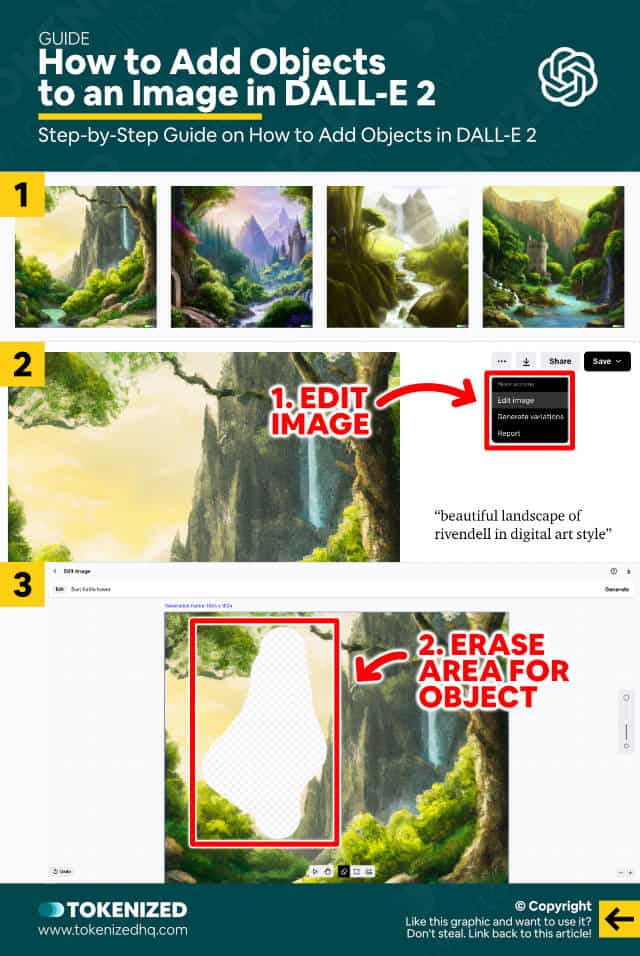
In our specific example we entered the following prompt in DALL-E:
beautiful landscape of rivendell in digital art styleThe set of images that were produced by DALL-E is actually pretty spot on in terms of what we were expecting.
But what if we wanted to add a new element in the background of one of the images, just to mix things up a little bit?
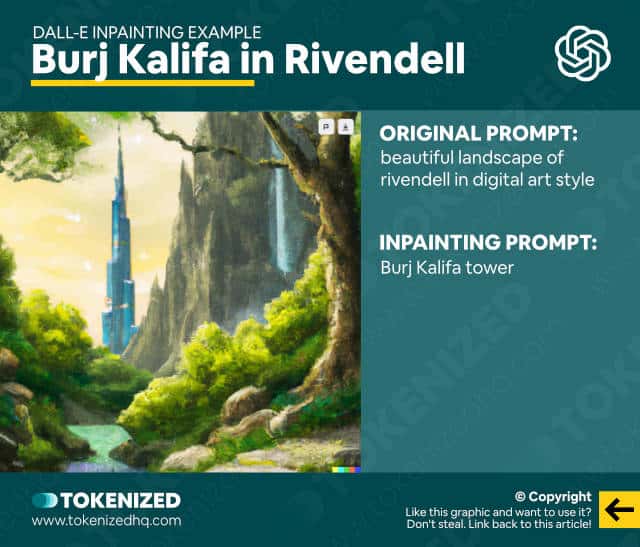
In fact, let’s add the Burj Kalifa tower, which usually stands in Dubai, to the background of the image.
We would use the DALL-E inpainting feature and here’s what we did:
- Step 1: Open the image you want to edit.
- Step 2: Click the 3-dot menu and select “Edit image”.
- Step 3: Now use the eraser tool to mark the area you want to edit.
- Step 4: Finally, describe the new object in the prompt field (“Burj Kalifa tower”) and hit “Generate”.
DALL-E will now start working in the background and after about 10-20 seconds you should get 4 images that include the Burj Kalifa, just like we asked for.

Of course, DALL-E inpainting doesn’t stop there.
You can continue to edit and manipulate the image to your liking, including removing objects rather than adding them.
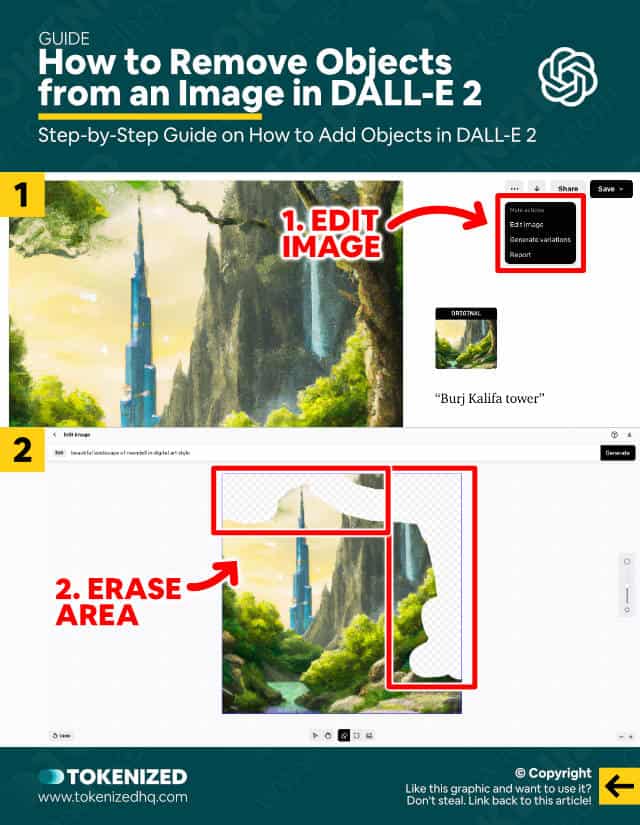
How about we try to remove the big tree that’s in the right part of the image?
How to Remove Objects from an Image in DALL-E 2

So now we’re going to try to do the opposite of adding new objects.
We’re going to use DALL-E inpainting to remove objects that we no longer want to see in the image.
The process is very similar to adding objects, except that you don’t add a new prompt but work with the original one instead.
This tells DALL-E that you want to remove a certain part of the image and it will try to fill the gap by blending into the surrounding area.
Here’s what you need to do:
- Step 1: Open the image you want to edit.
- Step 2: Click the 3-dot menu and select “Edit image”.
- Step 3: Once again, use the eraser tool to mask the sections you want to change.
- Step 4: Now, make sure you use the prompt from the original image and not the one where we added the Burj Kalika. Then hit “Generate”.
Step 4 is a bit tricky because you need to be careful with the prompts you enter.
When removing elements with inpainting, your prompt should describe what the overall image should look like.
This is distinctly different from adding objects, where your prompt specifically targets that particular object.
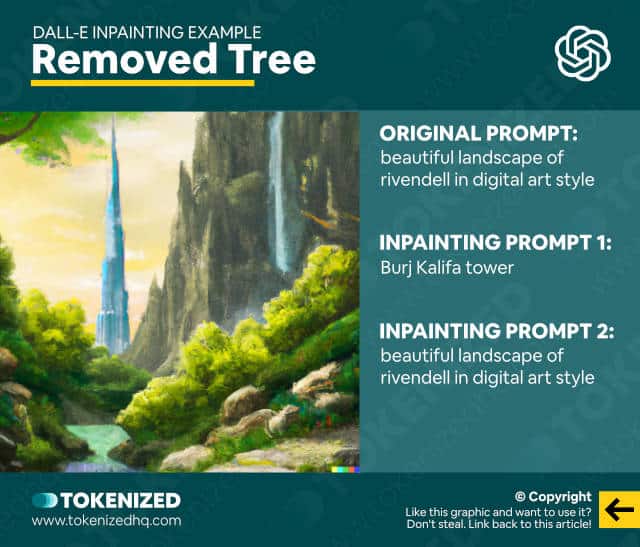
If we check out our final image, you’ll notice that the image looks absolutely perfect.
The only thing that has changed is that there is no more tree in our landscape and that’s exactly what we wanted to achieve.

Frequently Asked Questions (FAQ)
Before we close off this guide, let’s quickly address some of the most common questions related to DALL-E inpainting.
-
Can I use DALL-E Inpainting on existing photos and images?
Yes, you can. On the main page of the DALL-E app, you’ll find a small link below the prompt field that says “Upload an image”. Click the link and select your image. Then decide whether you want to crop the image or not. Afterward, you can use DALL-E inpainting to add or remove objects.
-
How can I add an object in DALL-E?
To add an object to an image in DALL-E, you must first open the image in the DALL-E editor. Then use the erasing tool to mask the exact location where you want to add something. Finally, enter a description of the object and hit “Generate”.
-
How do I remove objects in DALL-E?
Removing an object from an image in DALL-E is very similar to adding objects. Open the image in the DALL-E editor and use the eraser tool to mask the object you want to remove. Then enter a prompt that describes the entire image (rather than the object) and hit “Generate”.
-
Are Inpainting & Outpainting the same thing?
No, even though both use the same underlying technology, they are not the same. Inpainting is the process of manipulating the contents of an existing image, while Outpainting is the process of expanding an existing image beyond its current limits by adding more content to its edges. In more complex images it is reasonable to assume that both in- and outpainting would be used.
-
Can I use DALL-E to inpaint my Midjourney images?
Yes, you can. Simply import your images from Midjourney into the DALL-E editor and start editing. This is the closest you’ll get to Midjourney inpainting while it’s still not a native feature.
Conclusion
One of the most powerful features of the new DALL-E 2 art generator is the ability to edit an existing image.
It allows the user to add literally any object to an image, but also remove unwanted elements as well.
This feature, also known as inpainting, is an absolute game changer that truly deserves the term “painting”.
Here at Tokenized, we want to help you learn as much as possible about the AI software industry. We help you navigate the world of tech and the digitalization of our society at large, including the tokenization of assets and services.


