Are you looking for a DALL-E tutorial for absolute beginners?
You’ve probably heard about how AI art generators seem to be the latest craze and now you want to give it a try yourself.
Artificial intelligence is already quite a mouthful and it sounds terribly daunting but you’d be surprised how accessible it is to the everyday user.
In this guide, you’ll learn how to set up an account with DALL-E 2 and start creating amazing images from text prompts for free.
Let’s dive right in.
Table of Contents Show
Like this content? Then share it!
The Perfect DALL-E Tutorial for Absolute Beginners
www.tokenizedhq.com
Here’s the answer. Great article by @ChrisHeidorn right here: https://tokenizedhq.com/dall-e-tutorial/
Super-Fast DALL-E Tutorial in Under 60 Seconds
If you’re like me, then you’re probably quite impatient and don’t want to spend 20 minutes going through a full DALL-E tutorial.
That’s why I’ve put together this Blitz Tutorial that will quickly run you through the essential steps and help you get started in under 60 seconds.
You’ll figure out the rest as you go along and if you do decide you want to read the full tutorial, after all, you can always come back to this article.
So let’s get started:
- Step 1: Visit the official DALL-E 2 website and click the “Sign up” button in the top right corner.
- Step 2: Enter an email address or use your Google/Microsoft account to quickly log into DALL-E. You’ll have to verify your account with a phone number.
- Step 3: When you log in, you’ll see a dashboard with a big text field in the middle. You are given 50 free credits as part of your new account. They expire after 30 days.
- Step 4: Enter a description of the image you want to create and hit “Generate”.
- Step 5: After about 10 seconds, you’ll see 4 image variations based on your text prompt.
- Step 6: You can now enter a new prompt, generate new variations, or edit one of the existing images.
The instructions from this super-quick DALL-E tutorial will get you started.
If you want to get into more detail and also learn how to edit images, make sure you read the full DALL-E 2 tutorial below.
Key Points (tl;dr)
- Among all of the AI art generators out there, DALL-E 2 is probably one of the easiest ones to use.
- To get started with DALL-E 2, simply sign up for an account, collect your 50 free credits, and start creating images by entering your descriptions in the text prompt field of the web app.
- For those who are interested in learning a bit more about how to write prompts and also use some of DALL-E’s special features, make sure to read through our full DALL-E tutorial below.
What is DALL-E?
DALL-E is a text-to-image AI model that was developed and trained by OpenAI.
The first version of DALL-E was originally revealed in early 2021 and its name, as you may have already guessed, is a blend of Pixar’s “WALL-E” robot character and the Spanish artist Salvador Dali.
DALL-E is capable of interpreting text prompts using OpenAI’s GPT-3 language model and creating entirely new images.
While the first version of DALL-E was already impressive, the next generation DALL-E 2 really caught people’s attention when it entered into its beta phase.
Since September 2022, DALL-E 2 is open to the public and is already generating millions of images every day.
Our DALL-E Tutorial for Absolute Beginners
The following DALL-E tutorial will walk you through all of the basic steps from creating your DALL-E account to adding objects to an existing image.
My objective is to cover as many features as possible without going into too much detail.
If you want to learn more about the specific functionalities of DALL-E 2, you can always refer to our dedicated guides later on.
Lesson 1: How to Set Up A DALL-E Account
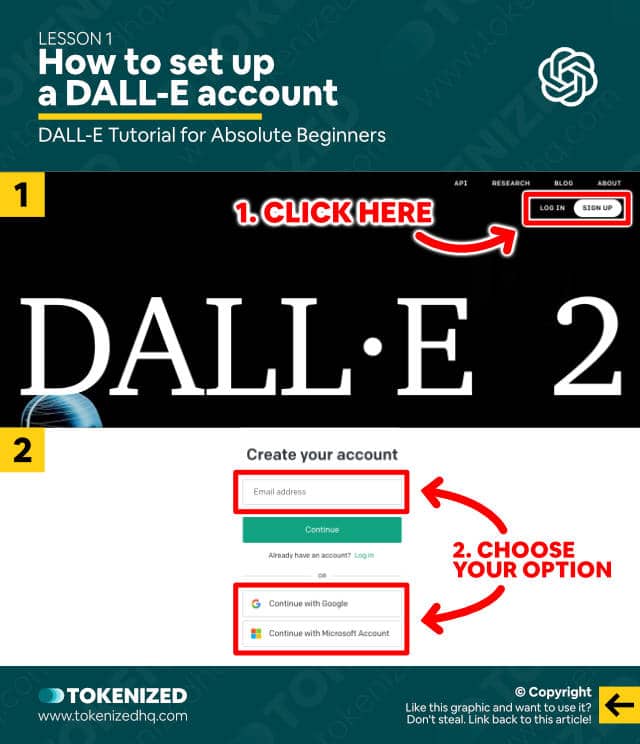
Setting up your DALL-E account is super easy to do.
Start off by visiting the official DALL-E 2 website and then click the “Sign up” button in the top right corner of the screen.
On the next page, you’ll be asked to enter your email address or simply log in with your Google or Microsoft account.
During this step, you’ll also be asked to verify your phone number.
This is necessary because every new account is given 50 free DALL-E credits and phone number verification helps limit potential abuse.
Once you’ve completed the setup, you’ll be redirected to the main screen of DALL-E, sometimes also referred to as the Dashboard.
You’ll see a big text field in the middle of the screen and in Lesson 2 of this DALL-E tutorial, I’ll show you what you can do.
Lesson 2: Write Your First Prompt
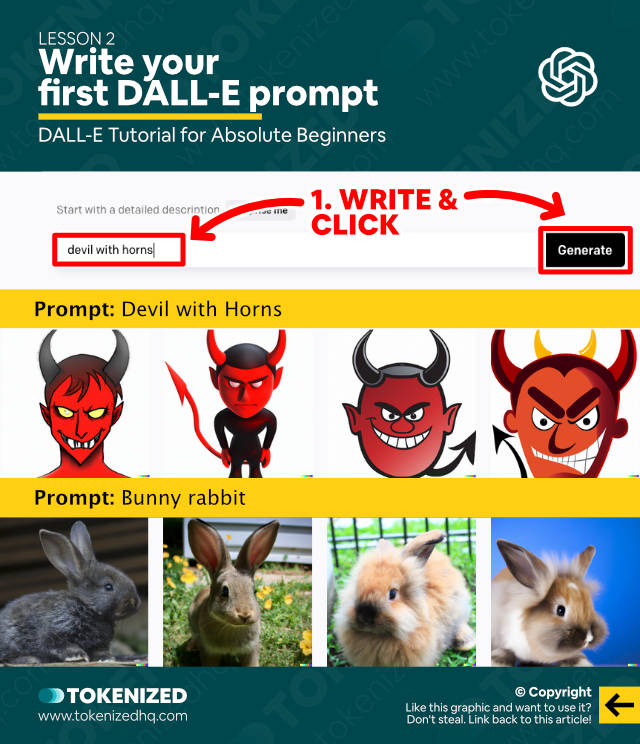
DALL-E is a so-called “text-to-image” generator, meaning that it translates text input into an image.
The more skilled you are at describing what you want to create, the better your results will be.
So think of an image that you want to create and describe it best as possible.
Here’s a very basic example:
devil with hornsIf I provide DALL-E with less information, it will start making its own judgment calls.
In this particular case, it decided to create images that resemble simple drawings or clip art.
Let’s have a look at another example:
bunny rabitThis time DALL-E opted for a more photo-realistic approach.
In fact, based on our experience, unless you specify otherwise, DALL-E will overwhelmingly prefer to create photo-realistic images.
Alright, so these images all used a very short prompt but what happens if I add a lot more detail to my description?
Lesson 3: Adding Art Styles to Your Prompt
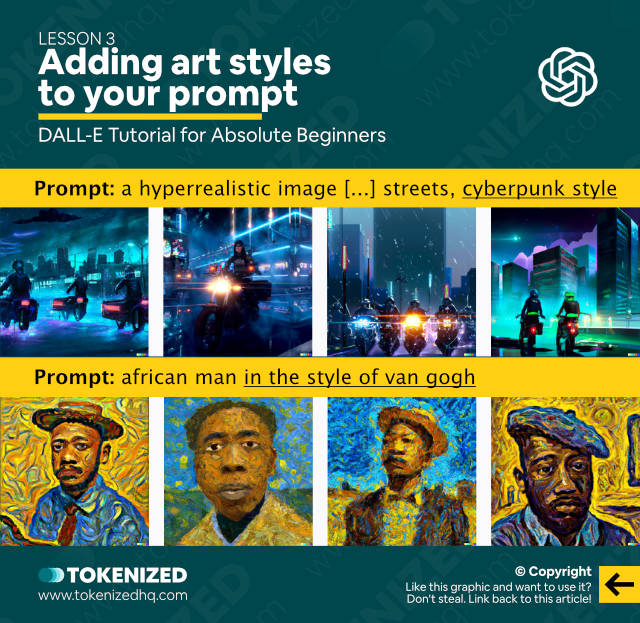
Let’s try entering something more complex with lots of detail and most importantly, a specific art style.
a hyperrealistic image of dystopian city landscape, futuristic police officers on glowing motorcycles drive through the streets, cyberpunk styleThese images already look a lot more impressive and are much closer to what I actually had in mind.
Notice how I added the “cyberpunk style” at the end of the prompt and it gave me exactly what I wanted?
Guess what? DALL-E is even capable of replicating the art style of famous artists.
Have a look at this prompt:
african man in the style of van goghThis is a short prompt but the crucial part is the “in the style of van Gogh” at the end.
DALL-E actually emulates the curly painting style that Vincent van Gogh was famous for.
Lesson 4: Add an Object to an Image
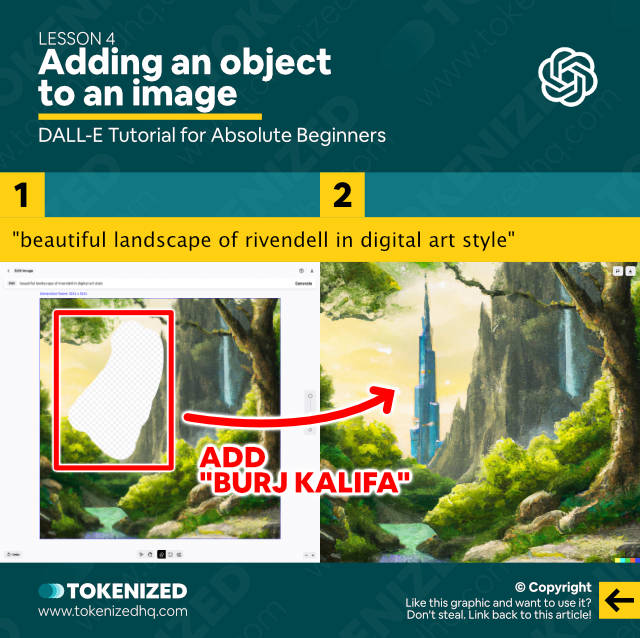
Now it’s time to take our DALL-E tutorial one step further because what makes DALL-E so amazing is the fact that it lets you manipulate existing images.
That’s right. You can actually change parts of an image with a process that is called Inpainting.
To illustrate this, let’s start off with a simple text prompt:
beautiful landscape of rivendell with a telecommunications tower in the background in digital art styleThis creates a set of beautiful landscape images.
Let’s say I wanted to add an object into the background of the image.
I’m going to place an image of Dubai’s Burj Kalifa tower.
All I need to do is select the “Eraser” tool and erase the section of the image that I want to change.
Then I’ll simply enter the text prompt “Burj Kalifa tower”, hit “Generate” and DALL-E will fill the gap based on my text.
DALL-E will also make sure that it blends perfectly into the existing surroundings of the image.
Lesson 5: Remove an Object from an Image
Alright, it’s time to move on to the next part of our DALL-E tutorial.
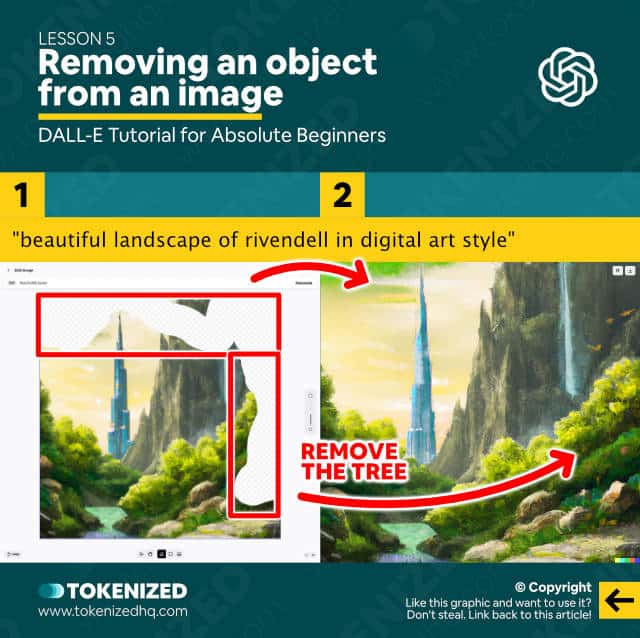
So now that we have our beautiful landscape with the Burj Kalifa tower in the background, I’m still not completely happy with the result.
In fact, the tree in the foreground is bothering me a bit and I’d like to get rid of it.
Believe it or not, DALL-E can help me with this as well.
To do this, I select the “Eraser” tool once again and start erasing the entire tree including its branches and leaves.
Then, I enter the exact same prompt that was used for the original image.
beautiful landscape of rivendell with a telecommunications tower in the background in digital art styleI also could have entered a new description, as long as it describes the overall image that I want to have.
Once again, I hit “Generate” and wait for DALL-E 2 to produce 4 image variations.
After a few seconds, DALL-E will produce 4 perfect images that include the Burj Kalifa but the tree has disappeared.
Lesson 5: Expand an Image
Before we close out this DALL-E tutorial, let me quickly introduce you to a very special feature.
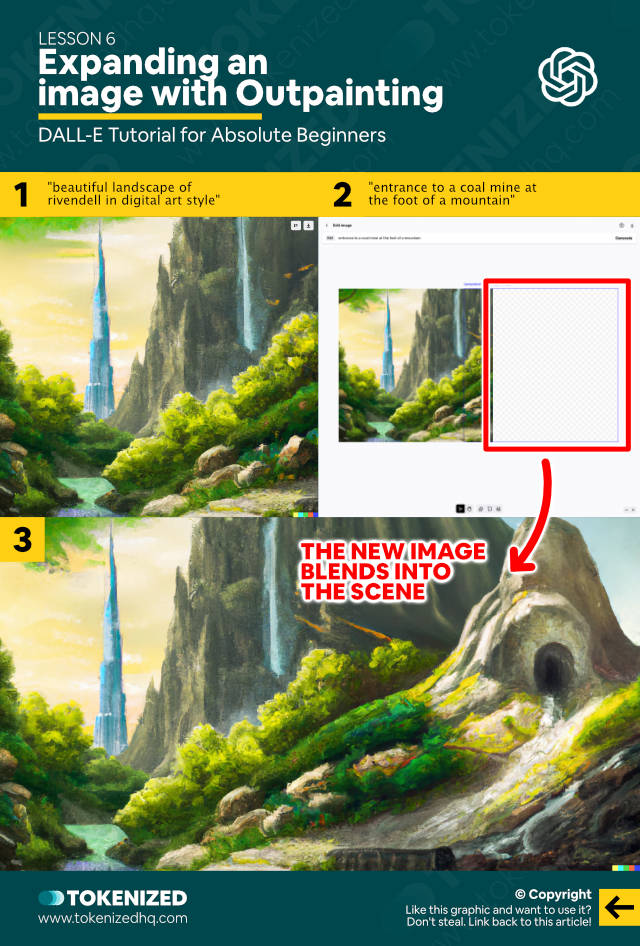
As you may have noticed, DALL-E’s images are always 1024×1024 pixels and there is currently no way to change the default aspect ratio of the generations.
However, DALL-E has an advanced editor feature called Outpainting.
With DALL-E Outpainting you can expand your existing image by adding generations to the outer rims of the image.
DALL-E will detect the style of the existing image and also take into account your new prompts.
This allows you to create much bigger images with considerably more control over details than would otherwise be possible.
The process really does feel a lot like “painting”, although I should point out that it’s also rather expensive because every additional generation frame costs 1 credit.
Frequently Asked Questions (FAQ)
Before we close off this guide, let’s quickly address some of the most common questions related to DALL-E tutorials.
-
Is DALL-E 2 available to the public?
Yes, DALL-E 2 was officially released into public beta in late September 2022. Anyone can create an account and will receive 50 initial credits for free. Users will also receive 15 additional credits every month.
-
How do I use DALL-E 2?
Visit the official DALL-E 2 website and sign up for an account. After verifying your email and phone number, your account will be credited with 50 free credits. You can then use the text prompt field to enter a description of the image you want to create. Then hit the “Generate” button and see what happens.
-
Can I use DALL-E for free?
Yes, you can use DALL-E for free as long as you do not use up all your free credits. New users are given 50 free credits for their first month. Unused credits do not roll over to the next month, however, you will receive 15 free credits every time a new month begins. So, unless you need more than the free credit allowance, you can technically use DALL-E for free forever.
-
How do you edit in DALL-E 2?
There are a few different features in DALL-E that allow you to edit an image. One of them is called “Inpainting”, which is used to add or remove objects inside a given image. Another feature is called Outpainting, which allows you to expand an image by adding frames to the outer rims of your image. Finally, there is an unofficial method that is called “Uncropping“. This allows you to “zoom out” of an existing image, however, this currently requires the use of an external image editor.
Conclusion
I hope you enjoyed this quick DALL-E tutorial that covers most of its critical features.
As you play around with DALL-E and get to know all of its functionalities, you will eventually start to dive deeper into each one of its features.
This DALL-E 2 tutorial was really just meant to get you started and show you what’s possible.
Here at Tokenized, we want to help you learn as much as possible about the AI software industry. We help you navigate the world of tech and the digitalization of our society at large, including the tokenization of assets and services.


