Are you trying to create an AI selfie in Midjourney?
You’re probably reading this because all your previous attempts at creating a Midjourney self portrait have failed.
Rest assured, creating a Midjourney selfie is far from easy, and many of the tutorials you’ll find online are either outdated or inaccurate.
In this guide, I’ll show you exactly what is possible and where you’ll run into the limitations of the technology.
Let’s dive right in.
Table of Contents Show

Like this content? Then share it!
How to Create a Midjourney Self Portrait in v5
www.tokenizedhq.com
Here’s the answer. Great article by @ChrisHeidorn right here: https://tokenizedhq.com/midjourney-self-portrait/
Can You Even Create A Self-Portrait in Midjourney?
The answer is YES and NO.
In fact, it’s kind of complicated, so read on if you’re interested in understanding why.
If you just want to know how to do it, then jump to the next section right here.
So ever since Midjourney and other AI art generators hit the scene, creating your very own AI avatar or selfie has been one of the most popular things to play around with.
The initial hype was primarily driven by an app called Lensa which allowed you to easily create a set of avatars based on some photos of yourself.
Since many people already had a Midjourney subscription, they naturally thought they could do something similar with it.
However, it’s important to note a crucial difference between different types of AI tools.
Most of the AI avatar generators ask you to provide between 6 and 12 input photos from various angles that are then used to train a “mini-model” of yourself.
Midjourney, however, currently does not offer such functionality since it is a very resource-intensive process and far too expensive to offer for free.
Instead, the only thing you can do is provide Midjourney with some reference images and hope to generate portraits that have similar features as you do.
While this can work to a certain extent, it’s not very reliable and largely depends on Midjourney interprets your facial features.
Most of the tutorials you see on the web that demonstrate how to create a Midjourney self portraits do not actually use photos of themselves or real people.
Instead, they usually generate the source images in Midjourney first and then use those to create portraits with the same character.
This is a very common approach that is used to create consistent characters.
However, it’s not a selfie and has nothing to do with creating a Midjourney self portrait.
So what can you do?
Key Points (tl;dr)
- It is currently very difficult (almost impossible) to create picture-perfect Midjourney self portraits based on external images.
- Creating consistent portraits works best when the original avatar or persona originates from Midjourney itself (e.g. from a text prompt) or already existed in large online databases of stock photography.
- You can heavily stylize selfies of yourself by combining the
/describeand the/blendcommand in creative ways.
How to Create a Midjourney Self Portrait
There are effectively 2 approaches you can use to create your own Midjourney selfie or self portrait.
The first approach is the traditional way of doing this and is relatively straightforward.
However, it is also rather unreliable.
The second approach is a bit more complicated but usually works quite well for stylized avatars.
Method 1: Using Reference Images
IMPORTANT: Remember, this method is unreliable and does not work very well if you want the images to look a lot like you.
If you’re not focused on getting a realistic photo of yourself but rather just a stylized avatar, then Method 2 might be what you’re looking for.
Step 1: Preparing Your Source Images
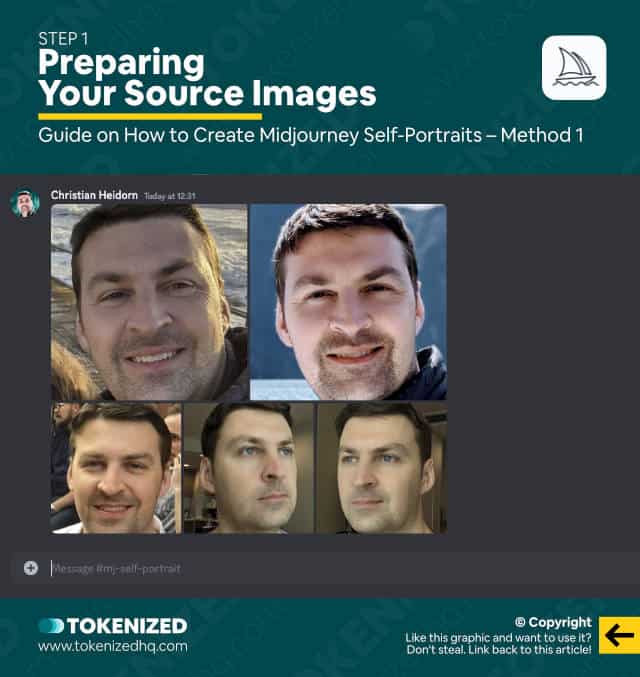
For this method to work you’ll need a strong reference image.
While you can try doing this with a single photo, I highly recommend picking at least 4-5 different photos of yourself.
Ideally, each photo should show you from a different angle and with different lighting conditions.
Since we’re focusing on creating a Midjourney self portrait, I also recommend cropping the images to eliminate most of the surroundings.
Step 2: Creating an Initial Self Portrait
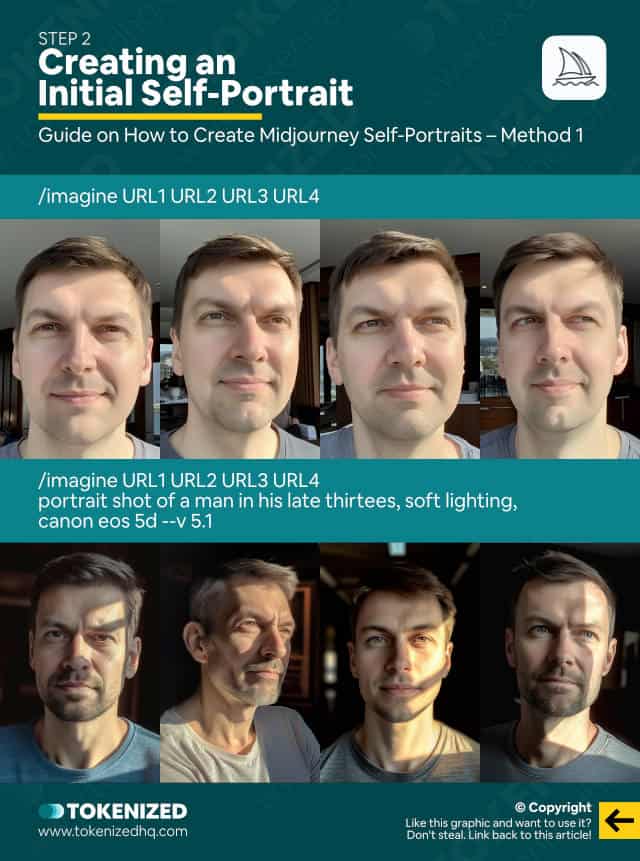
Next, upload all of the reference images into Discord or any other hosting options you may have.
The important thing is that you can retrieve the image URLs afterward.
Once you’ve uploaded all the images, copy their image links and paste each one at the beginning of your prompt.
/imagine URL1 URL2 URL3 URL4If you leave out the text prompt, Midjourney will simply create a mashup of all your reference images.
I therefore recommend working with a basic text prompt that also mentions your age group.
/imagine URL1 URL2 URL3 URL4 portrait shot of a man in his late thirtees, soft lighting, canon eos 5d --v 5.1The above is just an example.
You can obviously change it up and also switch between different versions to create your Midjourney self portrait.
As you can see, the results only remotely resemble the original.
Despite what some people claim, neither v4 nor v5 works better.
Step 3: Stylizing The Self Portrait
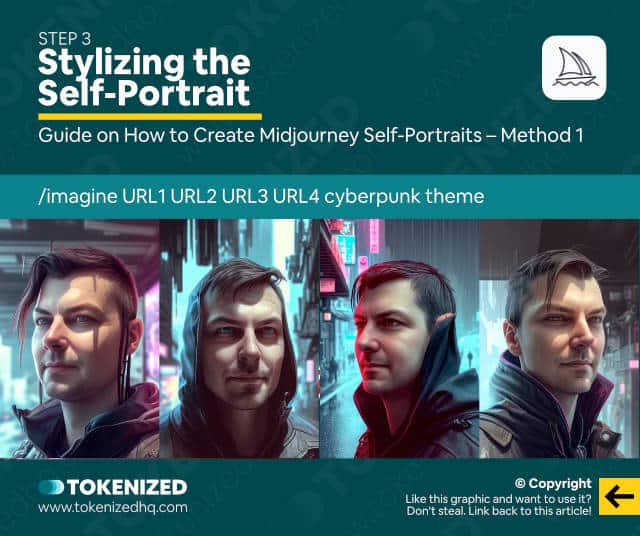
Naturally, if you’re content with the images you’ve gotten from this process, you can now start to stylize them.
This is done by adding elements to the text prompt, such as “cyberpunk theme” or similar descriptors.
/imagine URL1 URL2 URL3 URL4 portrait shot of a man in his late thirtees, cyberpunk theme --v 5.1You can also change the style of the image to something entirely different.
/imagine URL1 URL2 URL3 URL4 illustration of a man in his late thirtees, cyberpunk theme --v 5.1Once again, this process is not perfect
Method 2: Describing/Blending a Stylized Selfie
This is a rather unusual way of creating a Midjourney self portrait, however, it’s wildly popular among online communities.
Credit goes to Ms. Unicorn who shared this process in the #prompt-faqs channel of the Midjourney Discord.
Step 1: Pick an Awesome Selfie
Find the best selfie of yourself that you can find.
It doesn’t need to be a photo that was taken by a professional photographer but try to find a headshot that has good lighting.
Step 2: Feed the Selfie into /describe
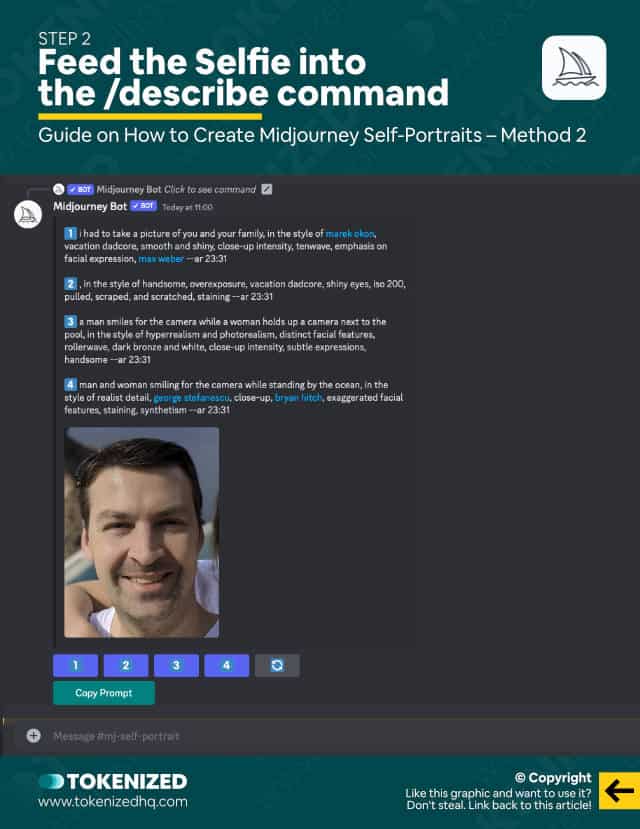
Next, enter the /describe command in Discord and upload/paste your real selfie.
Let Midjourney analyze your photo and after a few seconds, it will spit out 4 starter prompts to choose from.
So what do you do with these?
Step 3: Create Stylized Midjourney Portraits
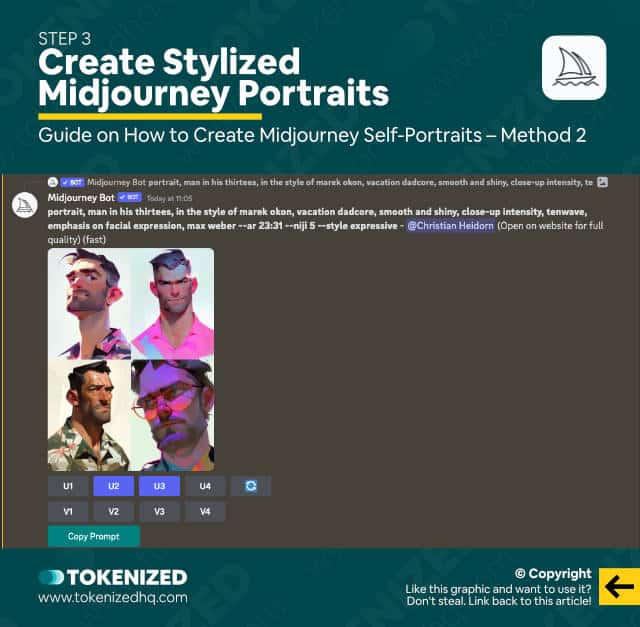
Now that you have starter prompt suggestions, click on one of the 4 buttons.
Before submitting the prompt, make sure you add --niji 5 --style expressive at the end of the prompt.
/imagine <STARTER PROMPT> --niji 5 --style expressiveHere are a few tips to get the most out of this:
- Remove references to other people and make sure the pronouns make sense for a self-portrait of a single person.
- Removing any reference to “realism” or “realistic” because it will mess with stylization.
- Add “portrait of” at the front of the prompt to ensure the right composition.
Try out all the options because it increases your likelihood of finding something you like.
Also, don’t be afraid to re-roll if you must.
Once you find an image that you feel looks most like you, upscale it.
Remember, it’s fine if it doesn’t look 100% like you.
After all, it’s supposed to be a stylized image anyway.
Step 4: Blend Your Original Selfie & The Niji Image
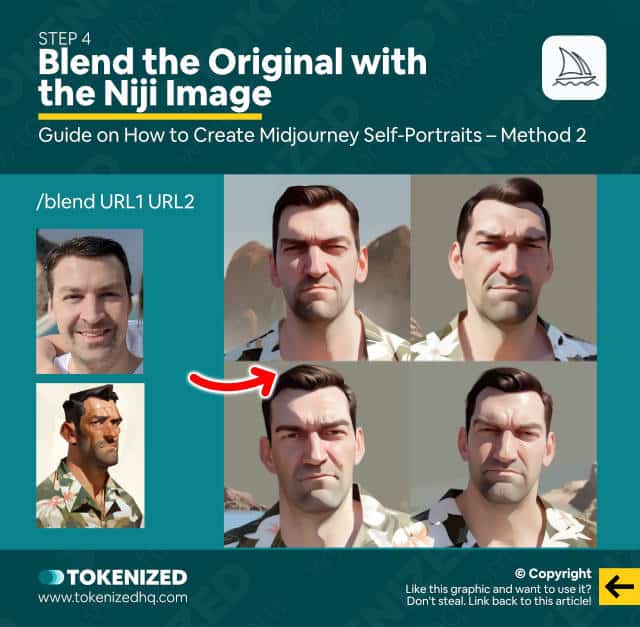
In this final step, you simply use the /blend command to mix together your original selfie and the stylized image you created in Niji mode.
Midjourney will then take the concept of each image and blend them together into a stylized image.
This is by far the most effective way to create a stylized Midjourney self portrait.
Frequently Asked Questions (FAQ)
Before we close off this guide, let’s quickly address some of the most common questions related to Midjourney self portraits.
-
How do you make a self-portrait in Midjourney?
To create a self-portrait in Midjourney, you must provide 4-5 image references from various different angles and with different lighting conditions. You can then add these source images as image references to your prompts. Make sure that your text prompt is a relatively accurate description of yourself. Generally speaking, while this can work, it is largely considered an unreliable method.
-
How do I get Midjourney to use my face?
Choose 4-5 close up photos of yourself and upload them to Discord. Then copy their image links and paste each one at the beginning of your prompt as image references. Then add a text prompt. Midjourney will then use your images as a reference a try to blend them with your text prompt.
Conclusion
Creating Midjourey self portraits has never been easy and it also comes with significant limitations.
Many of these limitations also exist for very good reasons, since the risks of deep fakes are quite real nowadays.
However, if you are content with creating heavily stylized images of yourself then Midjourney can still be a viable option.
Here at Tokenized, we want to help you learn as much as possible about the AI software industry. We help you navigate the world of tech and the digitalization of our society at large, including the tokenization of assets and services.


